Showing posts with label portraits. Show all posts

Tuesday, January 21, 2020

I've been playing around with Luminar 4.1 and I'm having fun with it. Most of the presets are over the top but the slider controls in the development interface are really pretty good.

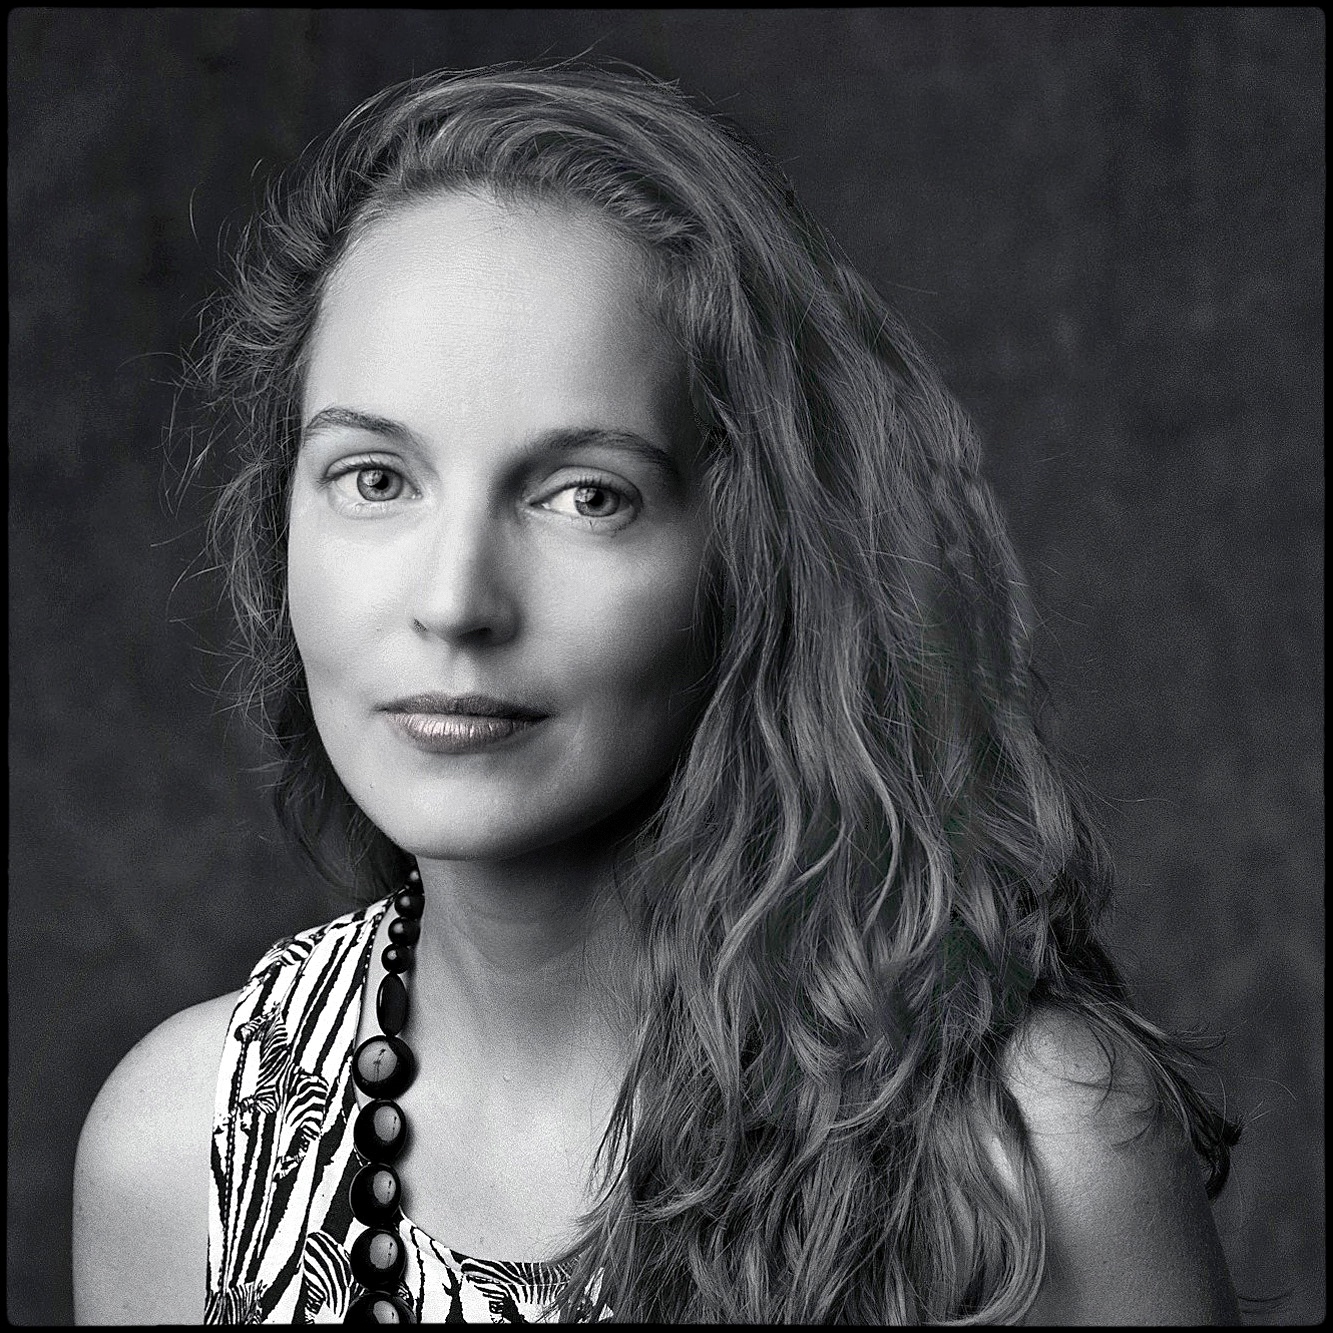
Lou. Not retouched in Luminar.

Some Facial retouch. And a tiny bit of lip color.

Skin Enhancer and a bit of vignette. 

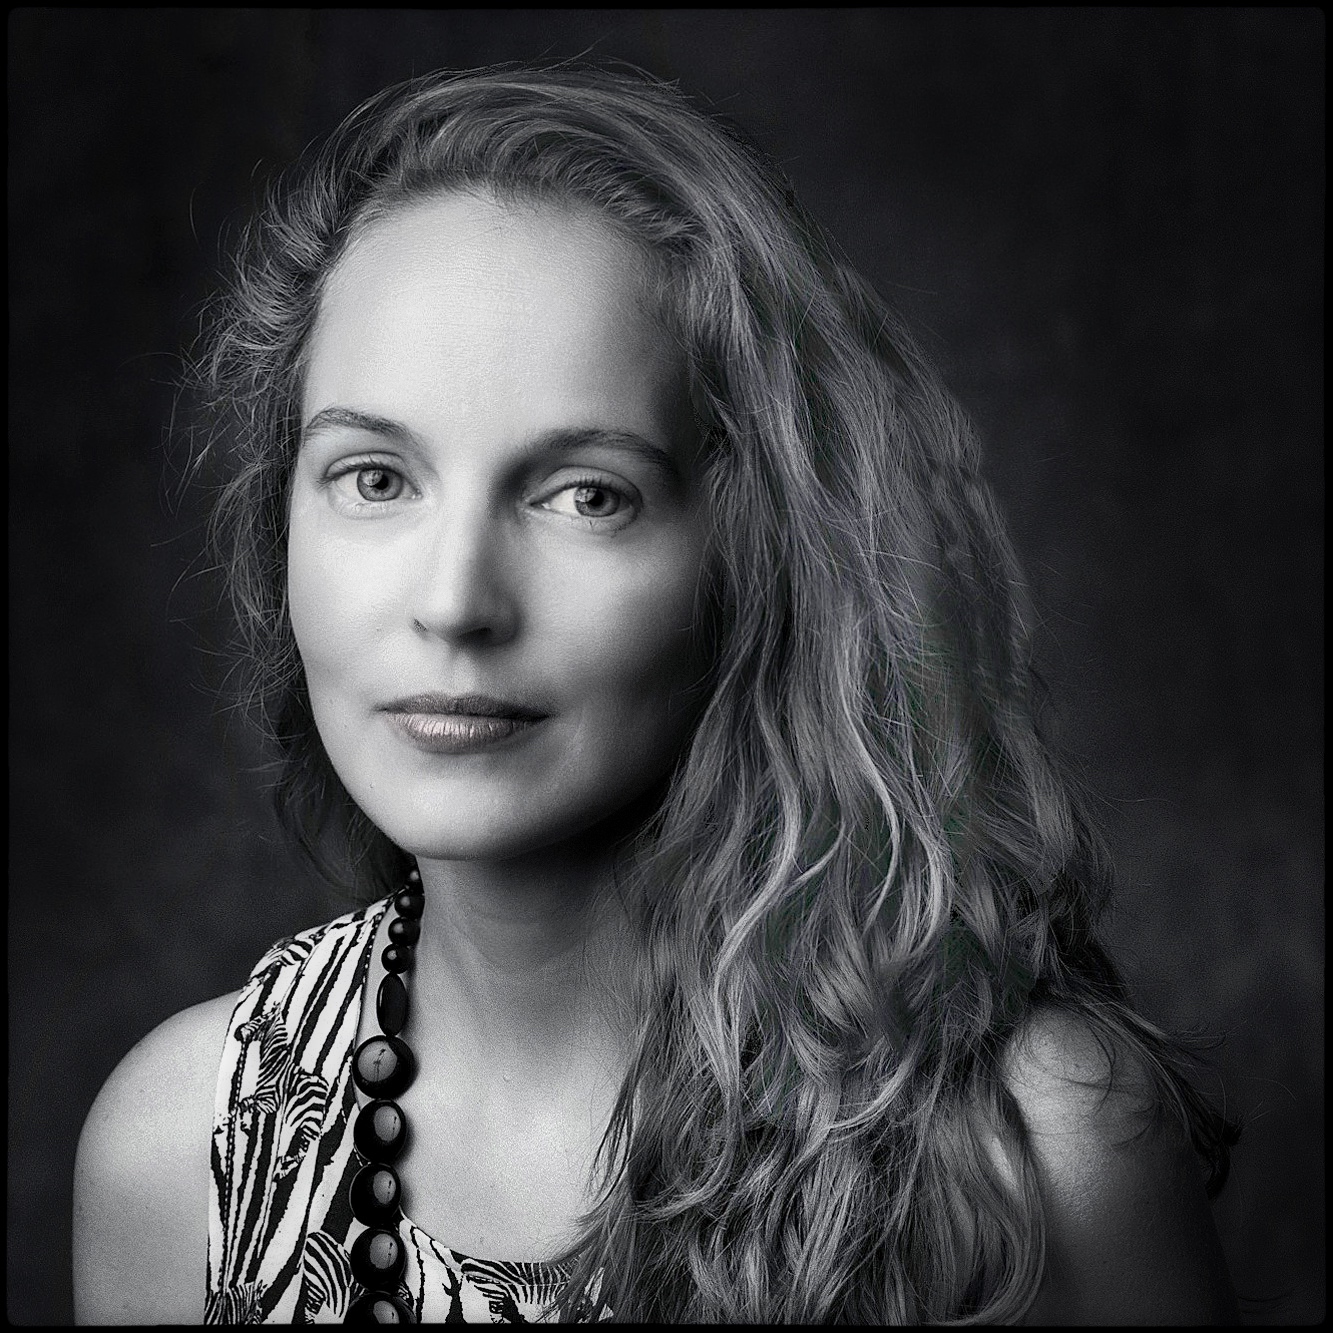
Dodge hair, burn background, add "Orton" effect (which is much like the diffusion we used to do under the enlarger.......)

I'm normally not a sucker for too many programs that promise the moon for landscape and portrait "enhancements" but Luminar 4.1 has gotten a lot of positive reviews and a decent sprinkling of critical reviews as well. I was convinced to buy it and try it by good friend, Frank, who had much good to say about the program's ability to replace skies quickly and effectively. That was the push I needed but I'd had the program on my radar because of several videos I watched that showed off the reasonably powerful portrait retouching capabilities, as well. 

So, what is Luminar? It's a software application that's been around for a few years but in its latest iteration it's been upgraded to use what the makers are implying? is artificial intelligence. It's a program that allows you to work on image files to fix things that were deficient when you took the photo (color balance, contrast, white balance, etc.) or to change the photograph, either subtly or profoundly, with "enhancement" sliders and/or canned presets. 

The buzz that accompanies the introduction of 4.0 and 4.1 is that the program now has magical powers that allow photographers to seamlessly and effectively drop in new skies in landscape photographs with nothing more than one button push and a bit of slider work. I'm a neophyte with the program but I tried the sky replacement in the final image below (along with the addition of dramatic sun rays) and I find that the program does a great job finding and separating skies form everything else. I had fun with it but will enjoy it much more if I get around to loading the 3,000+ skies I have in my "clouds and skies" folder. 

Many of the low cost (compared to Adobe products) image manipulation products on the market seem to only work with Jpegs and Tiffs but I've tried Luminar 4.1 with several raw files and it does work. The only disconcerting part of the process is when you finally save out the image. It seems that most of the screen representation that happens when you are working on an image is done with proxy files and then, when you go to save to a hard drive, the program switches to applying all of your changes on the full size file. With a high res file from the 47 megapixel Lumix S1R there is a long wait time (10 or 15 seconds) between pushing return and seeing the process completed. That makes this program a non-starter for me when I'm involved in doing many, many files in post production but is not at all a problem if I'm trying to tweak and massage one file at a time. 

But...as most of you know I'm more of a people photographer and not so much a landscape maven. So, how is Luminar with portraits? I think it's a really good "finishing" program and when the program automatically recognizes faces it does a great job applying some of the automated features as you go through the portrait enhancement menus. A few small things reveal it's economy class capabilities. For example, you can choose to enlarge a subject's eyes with a slider but, unlike the controls in PhotoShop's liquify filter, you can't select each eye individually and use the control to equalize their size. I use that all the time in PS. Why? Because people are very rarely symmetrical. One eye is almost always bigger than the other. But people like very much to see their own eyes equalized for size in final portraits. 

For most facial retouching Adobe offers much more detailed control over critical variables. 

I see Luminar as an adjunct to Photoshop in the same way that I use SnapSeed for quick and fun corrections to files I want to post online quickly. But with that being said I was very happy with the skin enhancement feature in Luminar, even though it's controlled by a single slider. It does a nice job, when used with a light touch, in minimizing aesthetically unpleasing skin texture without imparting a Barbie Doll Plasticity to the final image.

There's one feature that plays to my nostalgia for the darkroom. I used to have a device I could use under the enlarging lens that would allow for variable levels of diffusion in a final print and which would nicely blend the shadows into the highlights in a way that mimicked older portrait lenses. The feature is called, "Orton Effect" and I used it on the very bottom variation of Lou's portrait above. 
It takes a bit of the overt, digital sharpness out of files without destroying them altogether. 

The program has layers functionality but I haven't had time to test them out yet. It also has dodge and burn tools and I've found them to be easy to use and set up well. 

While the program would love to create yet another library on your hard drive and put all of your images in there the creators must have realized that this rigidity of workflow made lots of early Capture One users crazy with frustration so they've also provided the option of bringing in one file at a time and working with it normally. 

For $89 it's a pretty good deal. If I were not doing Photography for clients, and was only making prints for myself, I think I could use Luminar for about 97.5% of my work. But I'll hedge that by saying that I haven't yet done the work to figure out how to dust spot and do small, individual corrections (take out one pimple, eradicate one stray hair) yet. When I master that I'll probably spend most of my post time for portraits in Luminar and use Photoshop for intricate or complex corrections and fixes. 

(the images below are samples and are not meant to be considered the finest examples of my photographic art....). 

FYI, you can trial the program for free. I don't sell it and I don't do affiliate links so I'll leave it up to you to simply Google: Luminar 4 and find your own way down that yellow brick road.

As Shot.

with "AI" enhancements.

A dramatic and over the top sky replacement.

Friday, December 27, 2019

Work I did decades ago still drives my search for the right digital camera and lens. Odd how that happens. I'm finally narrowing it down.

L.L.

This was photographed in my favorite, old studio at 500 San Marco St., over in east Austin. I was renting about 3000 square feet of space which came complete with 20 foot ceilings. I got the space when the company that owned the building was converting it from warehouse space to office and studio space. I think my rent was somewhere around $750 a month and included righteously good air conditioning and electric power + water service. Now $750 would barely cover utilities on a space that size....

I still have a recurring dream that I inadvertently left a bunch of gear and paperwork in the space and also that I forgot to tell them I was moving out. I wake up worried that I've lost precious negatives and that I owe tens of thousands of dollars in back rent, starting from 22 years ago... But the reality is that I renovated a new space at a property we bought and settled out with the previous studio landlord with all the paperwork done nicely and properly.

But it was such a fun and expansive space in which to shoot. I could set up a portrait subject ten or 
twenty feet from the front of my camera and still have a space of 25 feet behind the camera for the background. With those kinds of distances one could use longer lenses and the focus fall off to the background was nothing short of exhilarating. I make due in a much smaller space now and for the most part it works out because: A. We own the space. And, B. The vast majority of projects I do these days are on location. Would I still like a studio with 60 feet of linear space to work in? You bet. Would I like to pay thousands of dollars per month to occasionally shoot a portrait with absolutely no constraints? Hmmm. Maybe not so much....

The image above was shot in the studio just for the hell of it. We went through so much medium format film in a month that burning through ten or twelve rolls of color transparency film photographing a beautiful subject was a tiny drop in the bucket, financially. 

This one was done during a test session. We were breaking in two new lenses for our Hasselblad system; one was the new just then 180mm f4.0 Zeiss lens and the other was the 250mm f4.0 Zeiss lens  (I was replacing the 250mm f5.6 version with the faster version made for the 201F and other F cameras). The image is a look that I liked (and still like) very much. A long, fast lens on a big chunk of film. 

In fact, it's been the gold standard I still use to judge how successfully a current camera and lens system comes to matching or even getting close to what we could do with MF film, without breaking a sweat. So, my system from 24 years ago drives me to look at particular cameras and lenses, in a particular way, even now. 

When I used the 180mm f4.0 lens on a 6x6cm square Hasselblad format the corresponding 35mm equivalent angle of view was about 100mm. It always seemed just right to me. The 250mm was equal to about a 135mm on 35mm which was wonderful in my longer studio but would be unmanageable in the current space. 

I'm currently trying really hard to fit the Panasonic Lumix S1R, coupled with the Sigma 85mm f1.4 Art lens, into the mix and trying to set up the smaller system to best emulate what I used to get from the bigger film system. It's tougher work than I thought it would be but with every model encounter I get closer and closer. The first big step for me was to limit the S1R to shooting in the square, 1:1 format. That makes the 85mm effectively about 10mm longer by comparison. The next thing is trying to find the right imaging parameters with which I can get deep, dark shadows but wide open, airy highlights. Not exactly trying to leverage the ultimate in dynamic range at both ends of the curve but mostly just at the lighter (shoulder) edge of the tonal range. It's all a compromise but then again, so was film and film processing. 

I'm in the studio today trying to reverse engineer my own lighting from the 1990s. I'm afraid I really will need to re-buy one more five by six foot soft box. Somethings just can't be substituted...

I hope you are making good use of your vacation. I'm re-branding and re-strategizing for 2020 and I'm working hard and locking down what I want to make. It takes new work.

Wednesday, January 29, 2014

My Theatrical Test of the Sony RX10. And what a fun romp it was.

My mistake. I used the clear digital zoom (interpolated pixels) feature on this one 
to get a 400mm equivalent that I could handhold.... 

One shoot. One camera. One Lens. (Not shown here, but still yummy: 24mm equiv. shots 
of the whole stage. And yes, the lines are straight).

By Austin Photographer, Kirk Tuck ©2014

If you've read the blog for a while you know that I shoot a lot of marketing images for the best live Theater in central Texas, Zach Theatre here in Austin. I've been doing it for twenty years now and I'm finally getting proficient at the whole thing. A lot of our shoots are studio productions done weeks or months before a play is ready for an audience. We used to do that kind of assignment with big strobes and Hasselblad film cameras and now we press whatever really good digital camera we happen to have into service. Any of the major brands, with more than 8 megapixels can do a great jobs when you have the camera anchored on a stout tripod, when you are using the best lenses and when you hot glue the ISO dial solidly to 100.

But the other portion of our photo assignments from Zach Theatre are what we call, "running shoots." These are the images that we take at the final dress rehearsals, and since the opening of the new Topfer Theatre (Zach's premier theater and stage) we do those dress rehearsals with an audience of "family and friends" in the house.

In the past I've tended to shoot these with full frame cameras and fast, long lenses but from time to time I've tossed in lots of Four-Thirds, micro 4:3s, and a never ending mix of strange birds like the original Sony R1 (still have some great shots from the Janis Joplin show from that camera...).
When I do a running shoot I try to cover everything so the marketing people have a wide range of images they can use across diverse marketing opportunities. That means I shoot a lot frames. So I get to know the camera I'm shooting with inside and out.

If you've shot live theater before you know that the light levels on the stage change constantly. You know that the light levels can get pretty low.  You know that the color of the light changes all the time (you can thank programmable LEDs for that...). And you know that actors constantly move and that their hands move even faster (1/250th and above can help stop hand blur. Sometimes).  You either want a camera that can read all that complexity or you need a camera that you can make adjustments and changes to almost automatically. A poorly set up camera can be a nightmare. A slow focuser will drive you nuts. And, you'll shoot at ISOs starting at 800 and, if you are lucky, cap at 3200.

In earlier digital days I found the Nikon D700 to be a wonderful theater camera when it came to focus and ease of exposure adjustments. It was great when we worked in tight. The big revolution for me came with the introduction of great EVFs.  Especially the one in the Sony a99. For the first time I could make "real time" adjustments and have a high degree of certainty that the images out of camera would match what I was previewing through the eyepiece. No more shoot-and-chimp.

I've been happy with the a99 and the 70-200mm 2.8 G lens but the entire universe is our lab and our newest infatuation here at VSL is the new baby Sony, the RX10. So, with a bit of trepidation I decided to go totally "bridge-cam" for the dress rehearsal of, "The Room Next Store."  Also known, in the theater circles as, "The Vibrator Play."  According to the camera critics I would be facing insurmountable odds. I'd be gnashing my teeth at the contrast detect auto focus. Especially on moving subjects going in and out of the shadows. The zoom of the lens would be too slow to catch any decisive moments, and the depressing capper to the whole gloomy undertaking would be the sheer nasty-ness of the microscopically small sensor. Even smaller than in the Olympus "world champion" camera. According to some critics I'd be better off using my cellphone....

Well. I'll cut to the happy ending. None of the crazy negative stuff came to pass. And the play is really fun, and funny and filled with clever examinations of sexual politics and hilarious plots twists. Well, just imagine a victorian society circa the invention of electricity and the idea of "curing" female and male "hysteria" with a vibrator.... I messed up a few frames from laughing too hard. I enjoyed it so much I was even able to ignore the woman in front of me who pulled out her cellphone and texted a bit...


Let's talk about camera set up. I have to face some limitations. The RX10 is not going to match the a99 or any full frame camera at ISO' above 800 so I decided to try to stick to ISO 800 and use 1600 as my high limit. Then I go backward and try to figure out what combination of shutter speed and apertures will match up we with that. I aimed for 1/200th of a second as a target shutter speed but I was willing to go all the way down to 1/80th since the image stabilization in this camera is very good. I knew I'd spend most of the evening at the long end of the lens so the extra stability was nice to have.

I was sitting in the middle of a (non-paying) audience (and I'm not a "dirty baby diaper hold" shooter) so I turned off the rear LCD and depended exclusively on the very good EVF. And that's actually a battery saving move as well. You see, there's a proximity sensor at the eyepiece and if you have only the eyepiece implemented whenever you move your eye from the finder it shuts off the monitor. Instant "eco" mode.


I usually shoot in large/finest Jpegs but I though I might need some extra finesse in noise reduction so this time I shot RAW which also freed me up to shoot in automatic white balance, thinking I would do my color corrections in post. I used the movable AF focusing protocol and selected "smallest" for the AF box.

S-AF for the mode. No weird modes like HDR or DRO engaged. But I did enable the Clear Image Zoom. High ISO noise reduction was not set as that menu item is grayed out in raw.

Here's what I found: The camera never failed to lock in quickly and accurately to the subject on the stage that I selected. The focus, unless the subjects were in deep shadow, was as quick as nearly every phase detection autofocus DSLR I've ever used and quicker than several camera from a few generations ago that were four to six times the price of the RX10. Sorry phase detection fans.

Here's the big news....The color the camera kept deciding on in AWB mode was, when I pulled the raw files into Lightroom 5.0, exactly like the color I was seeing on stage. Now remember, I've been fine tuning previous cameras with exact custom settings or exact kelvin settings in order to manage color but no other camera I have ever used for this kind of work ever got me so inside the ballpark before. After a while I just presumed that the files would be close enough to not need tweaking.

At 100% (the land of the pixelphilia) and at 1600 ISO the images have the mushy, painterly kind of appearance we've gotten used to seeing from high resolution, small pixel well cameras, including the Nikon d800 and the Sony a77 and Nex 7. The files at both 800 and 1600 are a little flatter (in contrast) and have softer detail than files at lower apertures. But this is only apparent at 100%. As soon as you pull back to 66% or 50% the entire image on the screen looks good.


There's that pesky digital zoom again. But you know....sometimes you want to get close.

That's as close as I could get with the (handheld) 200mm equivalent. But I sure like the skin 
tones and the detail.


I wanted the image to be a little contrastier so I used a slider setting of 10 in clarity. I went down to sharpening and pushed the amount slider to 70 and at 1.0.  Then I went one menu down and invoked a bit of noise reduction mostly in luminance but ramped up the detail slider a bit. Once done I applied these settings to all 972 files I'd shot. Then I went back through and did little exposure tweaks to groups of images.

While the files are not as good as my a99 they hand 1600 ISO better than the Sony Nex7 or the Sony a77 and I think that's also a big deal out of a camera at this price. But what really impressed me was the lens performance. This will sound heretical but I decided, given the pixel sizes and the sensor size, that the lens was probably diffraction limited wide open. All that means is that the lens is probably computed to be as good as it's going to get wide open. The next two stops might be better but probably not by much. I thought, "what the hell. Let's go wide open." Since I rarely needed more depth of field and I was generally trying to nail focus on the main actor or speaker I didn't have problems with areas going out of focus. On a couple of occasions I dived down to f4 but mostly out of curiosity. Hello sharpness.

The files out of Lightroom were done at their full pixel dimensions of 5472 by 3648. Most of the images will be used on the web or offered to magazines and other printed publications at a "press room" size of around 3000x2000 pixels so they'll be downsampled in half. If you print the images in a tabloid you'll still greatly exceed the print specs for any rational size use.

But wait, there's more. After pounding through 972 images over the course of two and a half hours of shooting via the EVF the first (and only) battery was still showing 23%. WTF???? I thought this camera was supposed to be a monster battery sucker and I thought the battery was supposed to be lame. Not in my experience. In fact, I should have mentioned that I got well over an hour and thirty minutes of "camera on" time when I helped my friend Chris shoot video on Saturday. I know what the specs say but they are based on focusing, shooting and refocusing while using a flash 50% of the time. Your mileage will definitely vary.


So what am I to think of all this? The perfect little video camera combined with a great still camera for theatrical work. Huh? Who would have guessed it? And who would have been crazy enough to test one under these conditions? Well, for that you can pretty much always count on the crazies here at VSL. We love that kind of thing.

My advice to you would be to avoid this camera at all costs. If no one buys it the prices will drop near Summer and our staff will be able to buy bucket loads of them for much lower prices. We'll use them for everything. Hell, what am I saying? I'm already using them for everything. I'll reconsider when I hit something that doesn't work. Don't hold your breath.


in other news: Belinda and I finished working on, The Lisbon Portfolio. The photo/action novel I started back in 2002. I humbly think it is the perfect Summer vacation read. And the perfect, "oh crap, I have to fly across the country" read. It's in a Kindle version right now at Amazon. The Lisbon Portfolio. Action. Adventure. Photography.  See how our hero, Henry White, blows up a Range Rover with a Leica rangefinder.....


Remember, you can download the free Kindle Reader app for just about any table or OS out there....


Monday, July 01, 2013

Metering is a wonderful thing.


I have two lazy habits that sometimes sabotage my best intentions when making photographs. I've gotten used to using cameras in automatic settings when shooting quickly, outside. I let the cameras set the white balance and the basic exposure. It make sense in a lot of situations but when you get into the studio and you are inventing the light it pays to do two things on every shoot. The first is to use a light meter. In my opinion an incident light meter is the only metering tool that works every time. The second thing I always do, if I am being mindful of quality in the studio, is to make a custom white balance. Here's the tricky thing: White balance affects exposure. Exposure affects white balance. I always meter first and then I do my custom white balance.

When I do a custom white balance I use the exposure I've gotten from metering instead of relying on the camera to compensate.

You may be able to make adjustments in raw to your exposures and your overall color balance but they will be compromises and you'll see it in non-linear color casts in shadow areas and you'll regret not metering when you find that the histogram in your camera convinces you to underexpose in nearly every situation. That under exposure robs you of detail in your shadows (if you want it) and adds color noise to the overall file as you "lift" exposure to get where you should have been all along.

We (collectively; not royally) tend to use RAW as a 24/7 crutch and a convenient excuse not to practice our craft with the diligence and mindfulness that we could. We've come to believe in an industry wide mantra which states that RAW is always better than a Jpeg file. I've done some technical digging and I'm here to tell you that a Jpeg file that is accurately metered and color balanced at the time of capture spanks the heck out of an underexposed RAW files that's brought back under control in post. And part of the problem is color shifts due to exposure differences.

I don't care what the web says on this. Every studio photographer and videographer needs to own and know how to use an incident light meter to work at a high quality level. And every photographer and videographer looking for consistency and quality should know how all their cameras make custom white balances. Over time it will save one much time and energy. Once you practice mindfully using your meter you'll walk off your shooting sets knowing that you've nailed the technical stuff. Getting the emotion right is a different beast. Don't let the technical get in the way of the wonderful....

And, yes, I get the irony of using a black and white image as the illustration for the top of the article. For all the literal folks, here's a color version:


Friday, March 08, 2013

If you are in Austin or plan to be in Austin before May 12th, go to the HRC and see the Arnold Newman Show.


"Photography is very unreal. You take a three-dimensional world and reduce it to two. You take color and reduce it to black and white. And you arrest the flow of time. There are many things that are very false about photography. You must recognize this, and build on it, and they maybe you'll have art."  -Arnold Newman.

My friend, Wyatt, e-mailed me a few days ago and suggested that I post information here about the Arnold Newman show at the Harry Ranson Center (aka: The Humanities Research Center) on the University of Texas at Austin campus. I was embarrassed when I realized that the show opened a couple of weeks ago and I hadn't been.

I don't recommend shows I haven't seen so I got into the futuristic Visual Science Lab car and headed over to the UT campus. Okay, the show is amazing. If you are a big fan of Arnold Newman's brilliant, black and white environmental portraiture you'll be in heaven. The entire ground floor of the museum is dedicated to showcasing hundreds of wonderful prints. If you aren't a big fan or you don't know who Arnold Newman is (go Google now...we'll wait) this show might surprise you.

"Oh, people set up these nonsensical rules and regulations. You can't crop, you can't dodge your print, etc., etc…  But the great photographers that these people admire all did that!" -Arnold Newman.

The venue is wonderful. And today was even more wonderful. While photography experts might come to the consensus that Arnold Newman is easily in the "top ten" of influential and amazingly insightful photographers who worked in the 20th century the show was made even more special for me because.....I was the only person in attendance. No line in front of the incredibly famous Stravinsky portrait (along with the contract prints and various croppings). No line in front of the Alfred Krupp or Picasso portraits either. Just an enormous, quiet, well lit room with me and a couple hundred amazing, black and white prints... Wyatt was right. If you're coming within 100 miles of Austin this should be on your list of "must sees."  Maybe even before Franklin's BBQ and the Continental Club.

"Successful portraiture is like a three-legged stool. Kick out one leg and the whole thing collapses. In other words, visual ideas combined with technological control combined with personal interpretation equals photography. Each must hold its own." -Arnold Newman.

When I finished staring at the beautifully crafted, fiber, black and white prints of equally interesting artists, actors and thought leaders of Newman's time I was a bit sad. It was obvious that photographers had much more leeway in the last half of the 20th century that perhaps we ever will again. The work showed a depth of conceptualism that made it more than a record or a magazine space filler. The background information conveyed by the curators of the exhibit made clear the reality that Newman could work on a portrait session until he got what he wanted....and he was able to solicit a collaboration with most of his sitters based on an intellectual sharing, and by using time as an ally.

The work is an amazing testament to the idea that people like Newman were creating art that pleased them first and sometimes singularly instead of just fulfilling the needs of a client.

If you want to see what photography was like when craft, talent, intellect and intention were required for success (not just good social media) you owe it to yourself to see this first hand. It's one of the best photography shows I have seen in ages. Made even more magnetic when you realize that he worked with a 4x5 inch view camera for most of his career and much preferred natural light and continuous light to electronic flash....

Wyatt was right. I was duty bound to report this one.


Thursday, January 10, 2013

Business Portrait from December.


I had a photographic assignment late last year to make images of a spa out near Lake Travis. We spent a day photographing different services, with models,  as well as interiors and exteriors. It was fun and crazy and I got to work with a bright, young art director named Mary Beth Taylor from one of my favorite insanely creative ad agencies, Clutch Creative. When we wrapped up the main day of shooting we still had one image that we needed to do; the owner, Melissa.

She runs a very high energy business and I wanted to remove her from the day-to-day interruptions and make her portrait here at the studio. We scheduled her portrait for a different day. I set up my usual lighting design for portraits with a large, softlight on the left and a fill diffuser on the right. I used a light gray background. When we finished shooting my regularly planned shots I noticed that the exterior light, coming from my wall of northwest facing windows and gliding through the white diffuser I had been using for fill, was nicer and softer than the lights I'd been using. 

I turned off the big flash but I left on the modeling light for fill. I tried some poses that were out of my normal routine and, when she turned around in the shot above, I loved the feeling of motion and connection. I had Melissa do variations of this pose for a few more shots and then we moved on a tried a few more poses and experimented with looser crops. But this was the image I really wanted that I didn't know I wanted until I saw it. I have yet another resolution for this year: Be open to the available light instead of always lighting everything to death.

I shot this image on my Sony a99 camera attached to the 70-200mm 2.8 G lens. The camera was anchored on my wooden tripod. I shot in raw and processed the image in Lightroom 4.3. The image required me to color correct the side of her face away from the light. The tungsten modeling light made that side too warm. I used an adjustment brush to make my corrections.

I often pine for the 85mm 1.4 Zeiss/Sony lens but images like this serve to remind me that I'll need to end up shooting at more reasonable f-stops like f4 and f5.6 if I want to keep both of my subject's eyes in focus. I really like using the 70-200 on a tripod because it has a mount that takes the weight off the camera and balances out the system. Which the twist of a lock button I can go from horizontal to vertical very easily. The 70-200mm is good at f2.8, better at f4 and wildly excellent at 5.6. It's the right tool for the job, if your job is making portraits in the studio.

Nice to start the year with a portrait I really love. Kind of sets the bar for the year.

blog note: Thanks to all the people who signed up for Wyatt's workshop/road trip/BBQ fest. I predict you will have much fun. I further predict that I'll sneak up and meet everyone for lunch. I'm a sucker for great BBQ and anything photographic...

Also, keep the comments coming. The feedback loop is priceless.


Monday, October 08, 2012

Obscure and marvelous objects of keen desire. Meter me. Please.


While the photo world pants at the rumor of more and more very similar cameras being readied for the market a lot of really cool stuff is languishing because it's not bling enough for prime time. The Sekonic Pro L-478D light meter is one of these cool stuff devices.  

While light meters seem to have fallen out of favor with most grab and shoot photographers I still carry around two different ones and use them on every shoot that requires me to use lighting.  I wouldn't want to do lighting set ups without one. The one that travels with me everywhere is the tough and hardy Minolta autometer V f.  Like most good meters from last century it reads both flash and ambient light. It's never broken and it takes a double a battery, which makes me happy.

In the studio I depend on my Sekonic L-508 zoom meter. It's a great incident light meter and it also has a built-in in spot meter function that I use, infrequently.  I use both the Minolta and Sekonic meters to measure mostly flash output on white backgrounds but after a bad experience with the rendering of test portraits on the rear LCD of a Nikon D700 I've gone back to making incident readings for every portrait session I do. I've found LCDs on most camera give varying results in varying ambient light environments and it's easy to under expose portraits since the live view or review screens always seem too hot to me.

With two meters in residence at VSL why in the world would I want the L- 478D? Well, mostly because it's so cool. It has features that I think are fun and useful.  I love the big screen and the fact that it's a touch screen. I like the front and center cinematography features and while I probably won't have a use for shutter angle settings as the world of film movie cameras darkens I find being able to set frames per second on the meter a big help when I'm trying to noodle in a good exposure that still hews to proper video technique.

The meter builds on the camera calibration we first say in the L-758 meter and the compulsively detail oriented photographer will have the option of fine tuning the meter and its read out based on actual camera performance.

But why use a separate meter at all? Precisely because we are so subjective when it comes to visual analysis. Most camera LCDs and EVFs show a preview or a review based on the jpeg converted file generated by our cameras, even when we are shooting raw. The exposure latitude of jpegs is much narrower and I've found that camera makers consistently engineer their cameras to err on the side of underexposure in nearly all situations. Even when the image on the screen is big and bright. You can see it plainly if you examine your camera's histogram and compare it with what you are seeing when you look at the same image on the camera's screen. The screen shot looks bold and bright while the (too tiny) histograms almost always have a notch-lette of flat line over to the right hand side.

When I use an incident flash meter, at the subject location, aiming directly back to the camera I generally get readings that are one half to one full stop more aggressive than what my cameras suggest. When I trust the meter I generally get perfectly exposed skin tones and detain in all highlights but I don't get crunched shadows and ruddy transitions from mid tone to dark in portraits.  That alone is enough to keep me using meters for a long time to come.

Where incident light meters really come into their own is aiding in the quick and precise set up of white background studio shots. I meter the background to make sure it's even and I take the incident reading (plus 1/3 stop) as my base for the set up. Then I use the incident light meter with the subject and raise or lower the illumination on the subject until it reads what the background does (before adding the 1/3 stop correction for detail-less white...) and I know I'm where I need to be to have the cleanest, noise free files with the right tonal ranges. Magic.

You're probably able to do much the same process with the reflected light meter in the camera but there's more math involved and the reflectivity of the background materials makes a difference in the accuracy of the metering. 

The reason I want the new is mostly that the new display is much more readable for me than the older, lower contrast, monochrome displays of the older meters. I also like that I can make changes to frequently used parameters on the touch screen rather than having to find the right button and scroll.

The meter uses two triple "A" batteries, which is better than some obscure older camera type battery (I'd prefer one double "A"....).   With included accessories you can use the meter as a reflected one instead of an incident light meter, and, by adding an accessory you can convert the meter into a five degree reflected spot meter.  The meter is highly configurable and offers thirteen different custom settings. It is firmware upgradeable via an USB socket.

Both of my current meters are over ten years old. Buying a new meter happens rarely but they are pieces of gear that I use nearly every day. When I'm shooting with a non-metered Hasselblad they are a constant companion. Now, if I can just get approval from the CFO.....


Friday, August 03, 2012

The LED Lighting book finally arrives in the Kindle format. Thank Goodness!!!

After months of waiting my fifth book, LED Lighting: Professional Techniques for Digital Photographers, is now available as a Kindle Book on Amazon. The price of the Kindle Edition is around $15. I don't know what took Amazon so long to get this one out but I wanted the large group of people who've e-mailed, asking me to hurry up the process, to know that it's here, available now.  I'm just in the process of downloading it myself. 


FYI:  Some of my readers who use iPads were unaware that you can download a Kindle app from the App Store for free and it will allow you to buy Kindle books and read them on your iPad.  It works just as well as reading them on the new color Kindles with the added advantage of a bigger screen and a much faster system and processor.


Please buy a copy of the LED book and help support the Visual Science Lab blog!  


Wednesday, June 13, 2012

Late in the afternoon, fishing at the old Perdanales State Park.

A few years back there was a magazine in Austin called, Texas Life.  It was a bold upstart that intended to go toe to toe with the heavyweights like, Texas Monthly.  They ran out of money and in a matter of months were gone.  But while they were rolling we did a lot of photography for them. At one point we did a fashion-y piece about the outdoor life in central Texas.  Fishing, hiking, taking a long swims in cool streams...that kind of thing.


I photographed these two models using my favorite camera and lens of the moment.  A Leica R8 with a 180mm Elmarit Lens.  These are from e-6 slides scanned on the Epson Perfection V500 Photo scanner.  It's a different look...

The Leica R series cameas and lenses never got the press that the M series does.  Probably the more conservative and traditional body put it directly in competition with the much less expensive Canon and Nikon flagships.  Kinda tough to justify spending twice as much for the tool...unless they are better.