Friday, May 06, 2022

After two big event jobs and a bunch of smaller advertising projects I spent some time pondering what I could add to the equipment mix to make life either easier or photography more interesting...


As you might have read I've taken a step or two back into the smaller format systems of Panasonic and Olympus. Some things have changed since I last worked with the smaller format. I'm not really designating either the m4:3 cameras or the Leicas as a "primary" system but am choosing them based on what a project might call for instead. And to that end I'm finishing out the smaller system with "needed" lenses. This allows me maximum capriciousness. 

Before my early April job with the big software company I bought an Olympus 12-45mm f4.0 Pro lens. More out of curiosity than need. I thought it would be cool to have something very flexible, very sharp and very small --- if that's the way it turned out. I was happy with its performance and found that it was at least as good, optically, as the Panasonic 12-60mm f2.8-4.0 lens. It's actually a more or less perfect walking around in good light lens. One thing I learned on the software retreat was that 60mm isn't long enough, even in small ballroom, to get effective speaker shots. 

When I went to Santa Fe last week for the gigantic banking association meeting I over-compensated by bringing along the Panasonic S5 and the Leica SL2 with big lenses. But I also doggedly brought along the m4:3 stuff as well. Most of the photos in Santa Fe were done with big, full frame lenses and full frame bodies but I did toss in a fair number of GH6 shots, mostly done with the 12-60mm, just for fun. They were more than adequate for quality it was just the reach that was lacking...

While shooting and working in Santa Fe I was invited to do a similar job in late June, in Nashville. This opened up a new line of thought for me. There's no way I'm going to drive to Nashville. In fact, I may never drive much further than San Antonio ever again! But I started thinking about packing gear for airplane travel and remembered the 26 round trips I did on airplanes in Fall of 2018 for a national infrastructure company. On those trips, on and off smaller regional jets and even smaller private aircraft, space and weight was a big consideration. Most of our locations were relatively remote and many times required a mile or so of walking in. On difficult terrain. And the side of mountains.

On those trips I packed a couple of G9 camera bodies and a small assortment of really good lenses. They worked very, very well. The images were well received and the small photo backpack I chose fit under any conceivable airplane seat. It seems I had found the sweet spot and the prevailing rationale for the smaller format systems. 

Once again, on a later trip to Iceland, I also packed the G9s and some of the same lenses. Looking back at images from that trip I thought the output from my selection of lenses was equally good and equally effective. 

So now I'm looking at packing up a backpack that will, again, fit under the seat of any airplane and also provide me with enough capability to provide extensive coverage of the next banker conference. The biggest gap in the system last week was longer lenses. The kinds of lenses needed for discreet podium photos of keynote speakers, entertainers and expert presenters. My first big zoom for the smaller system, back in the "old days" was the Olympus 40-150mm f2.8 Pro lens. Perfect imaging but a very hefty package to work with for long periods of time, handheld. 

The second lens I used with the "Pixie" systems was the Panasonic/Leica 50-200mm f2.8-4.0 lens. It's a really nice one but it's pricey and I don't really think it has the same "bite" as the Olympus mentioned just above. I'd been trying to track down a copy of one of the new Olympus 40-150mm f4.0 Pro zooms from Precision Camera but they kept coming up empty. My rationale was multi-fold. This lens is very small, very light and supposedly very sharp. While it's slower than the other two (aperture-wise) the f4.0 isn't bad and it's constant. If the lens is sharp wide open then it's not an issue. It will work for my purposes.

In my dreams I imagined a backpack that had only the two Panasonic bodies (GH6 and GH5ii) along with the Panasonic/Leica 12-60mm and the new Olympus 40-150mm f4.0 Pro lens, augmented with one fast prime. The rest of the small, "Airport Advantage" backpack would be filled with dedicated flashes, extra batteries, chargers and cables. It would weigh about half the poundage of my last packed case and provide everything I would need for a corporate event. The bonus being "enhanced mobility."

So, I fired up the potent and glorious Subaru Forester and headed to the camera store. We looked for the Olympus lens but came up empty. I found a used Panasonic 35-100mm f2.8 ii on the used shelf for the kindly sum of $579 but it really wasn't what I wanted. I found the Olympus lens on their website and it showed that it was currently in stock so my sales associate redoubled his efforts. Eureka!!! We found the lens I really wanted. I even got a nice discount on the purchase....

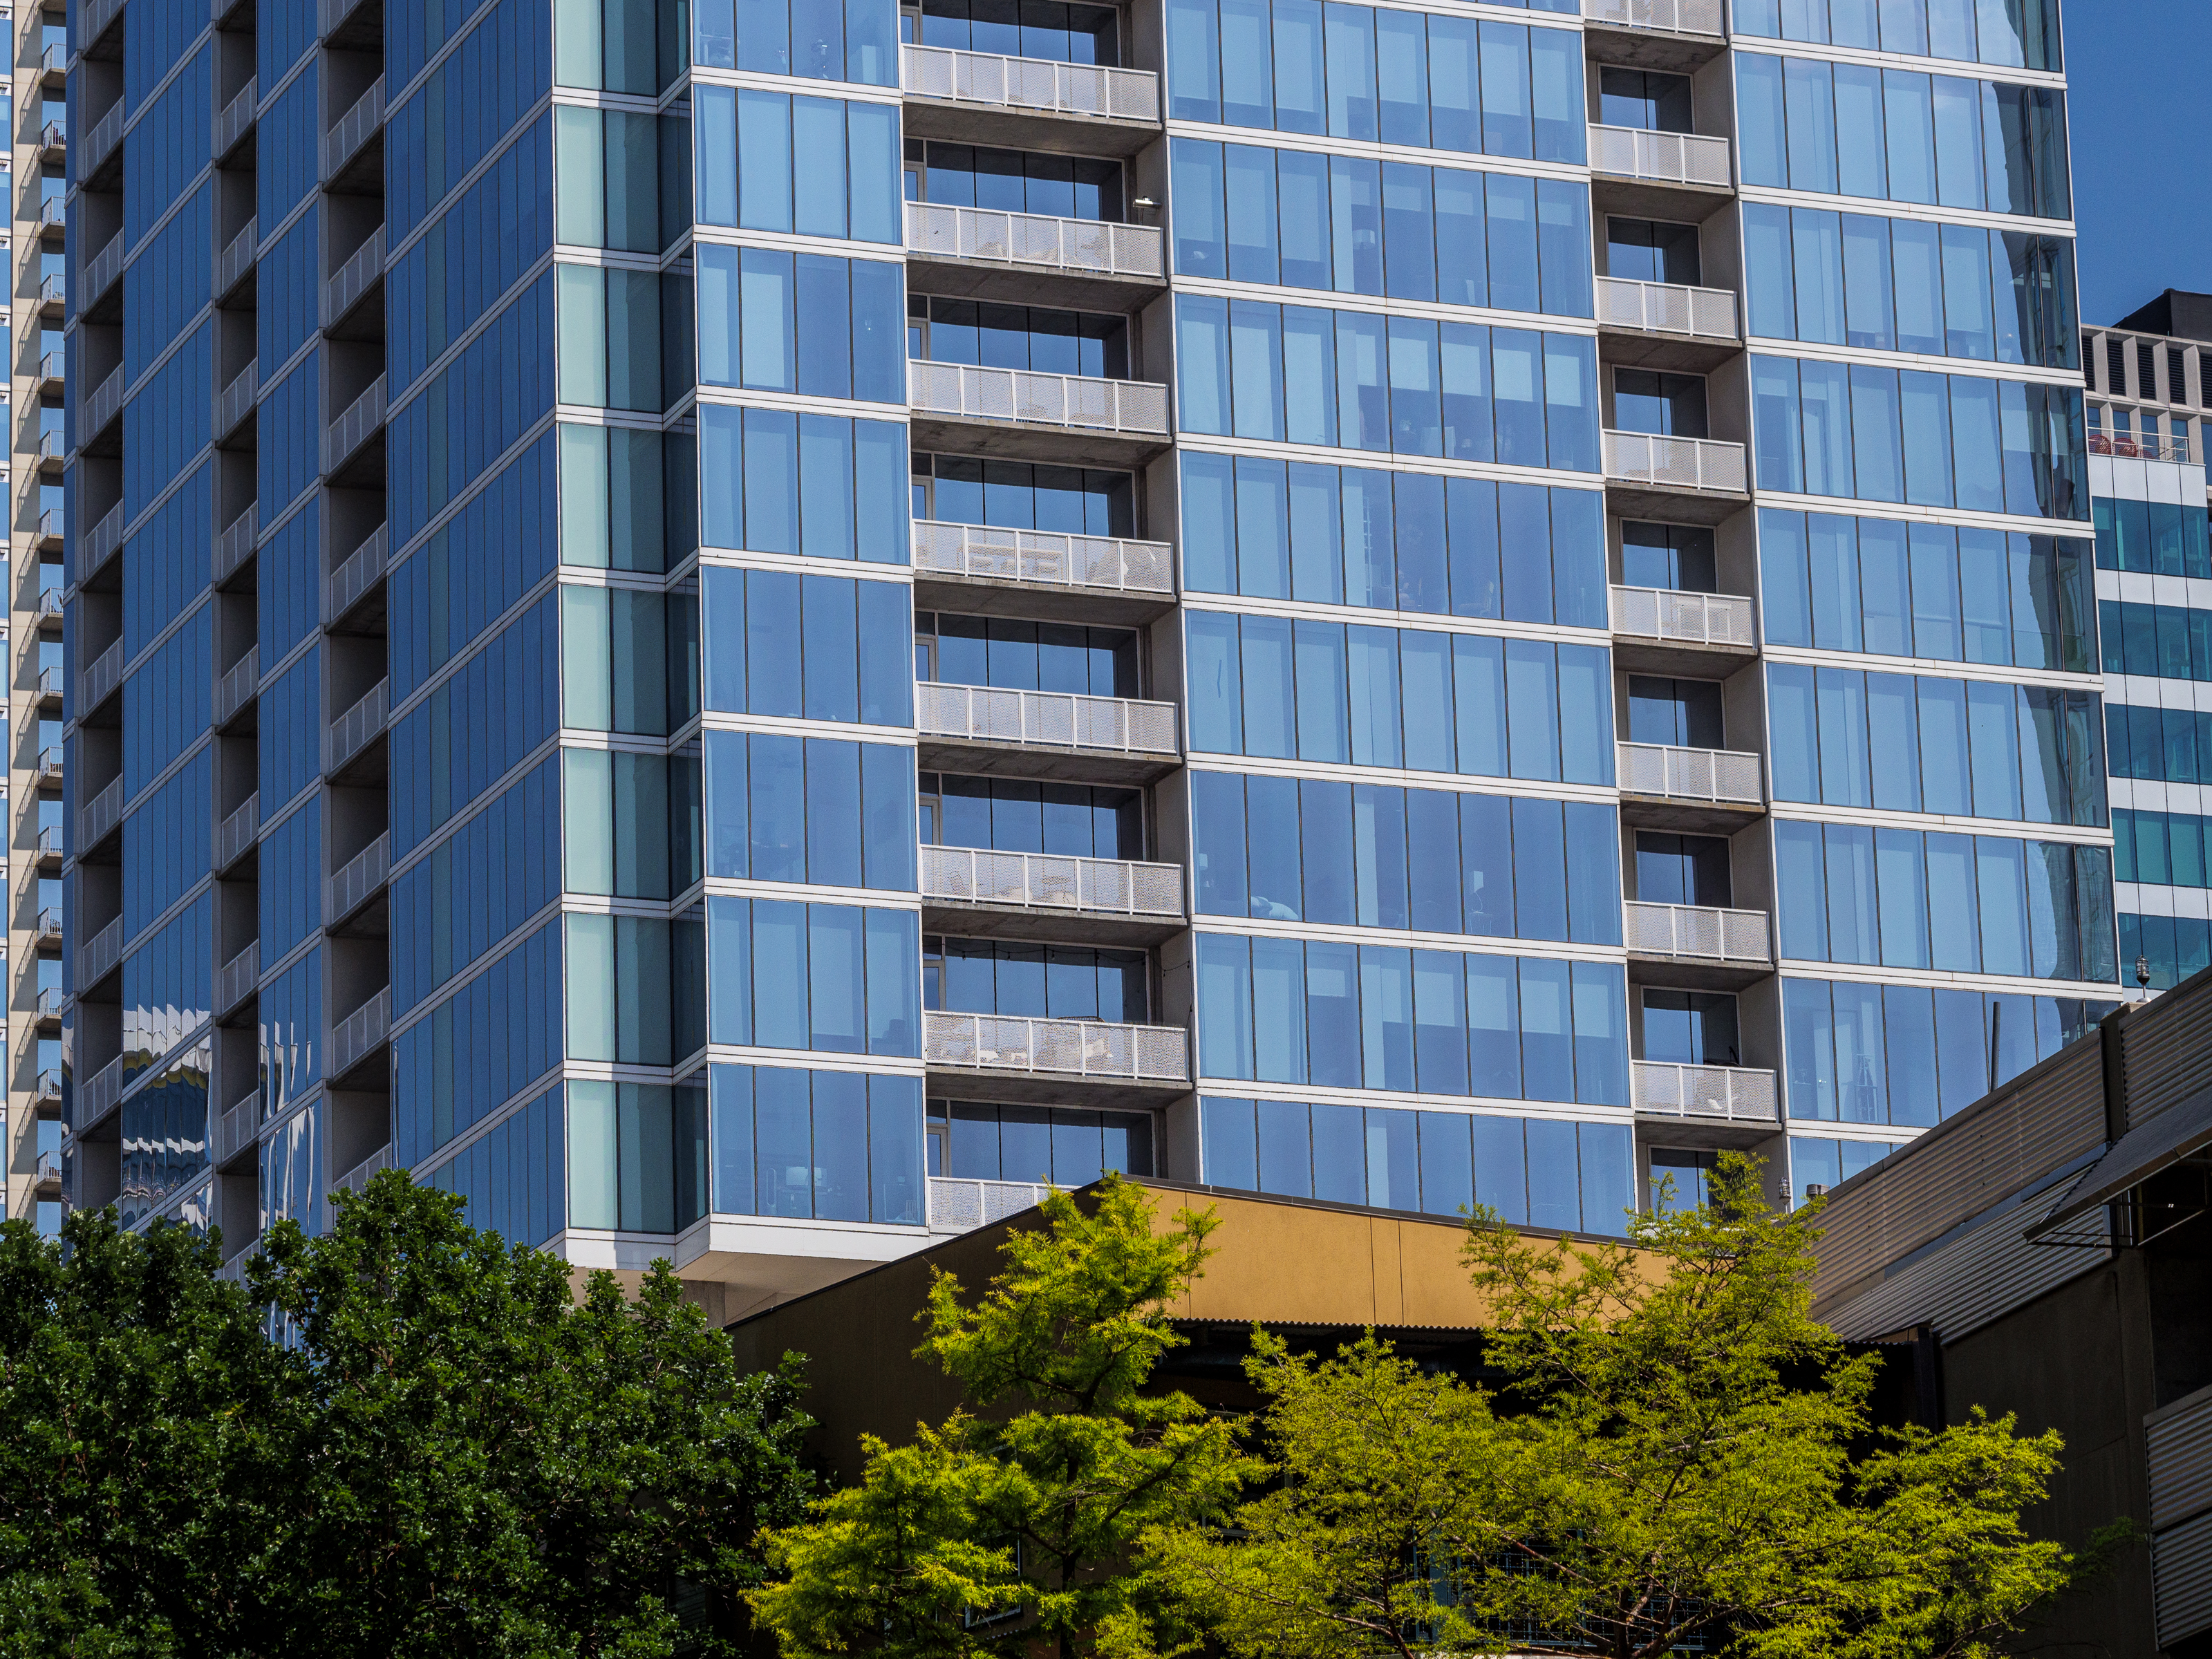
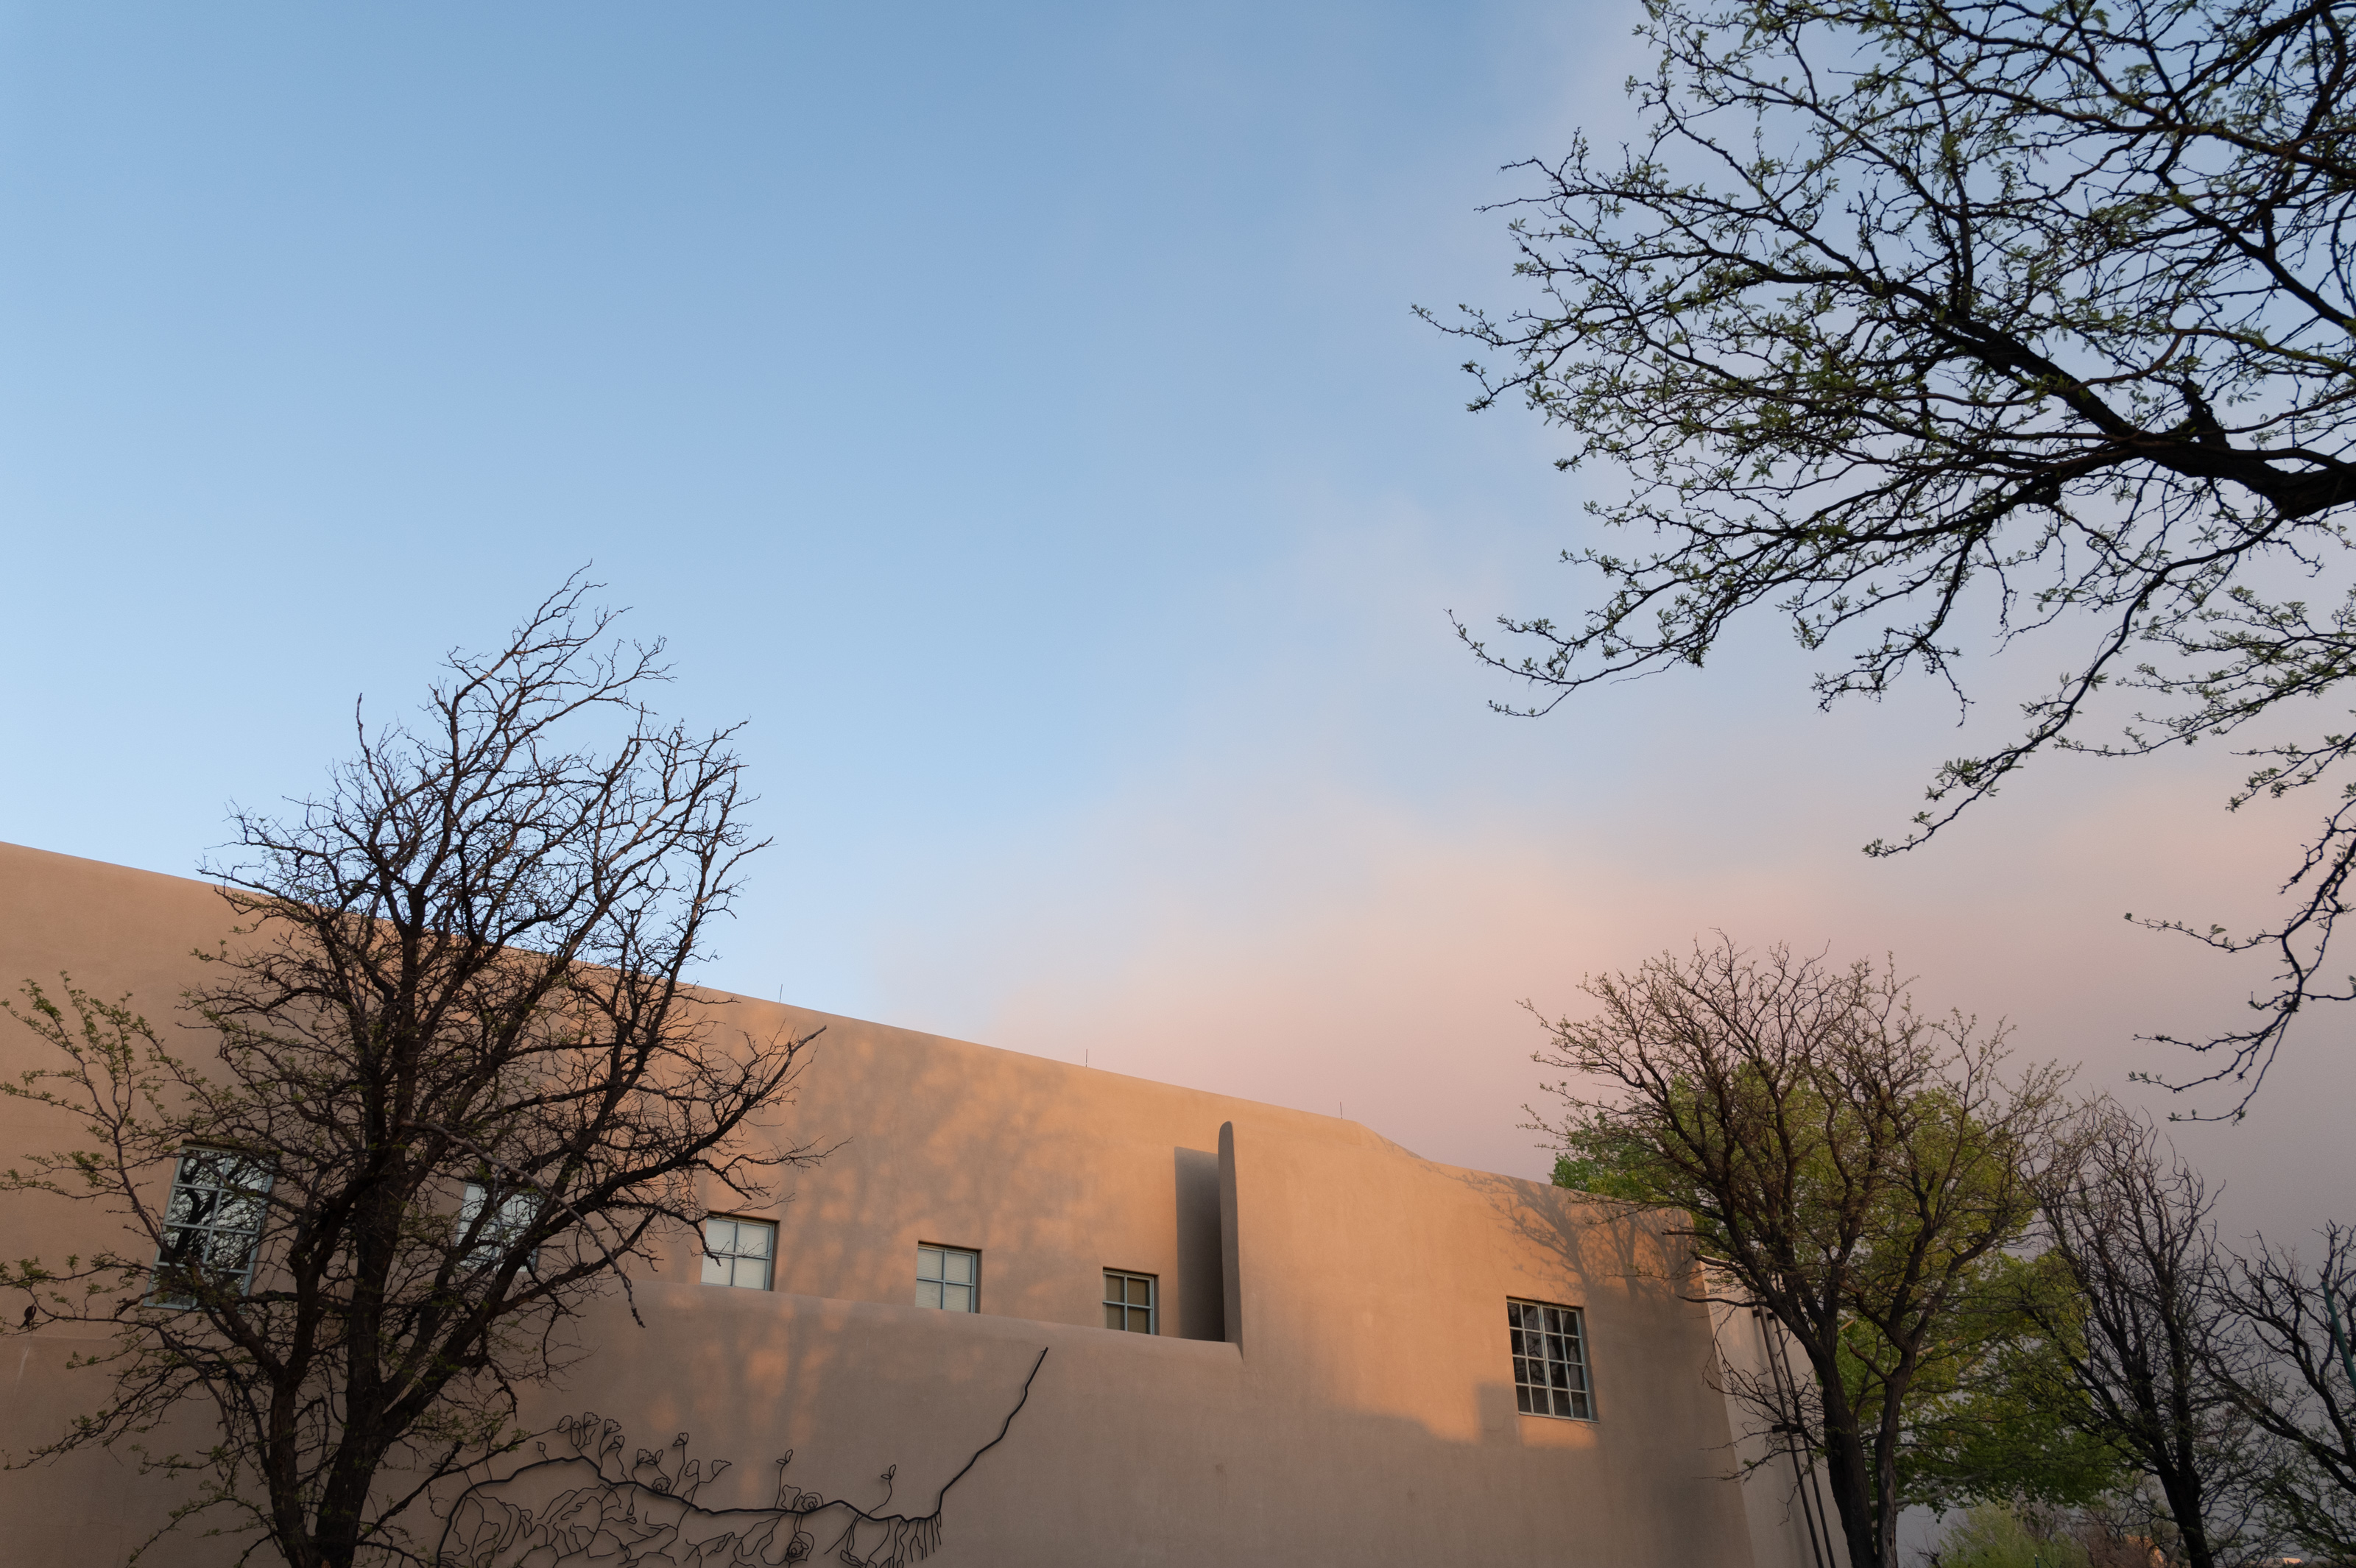
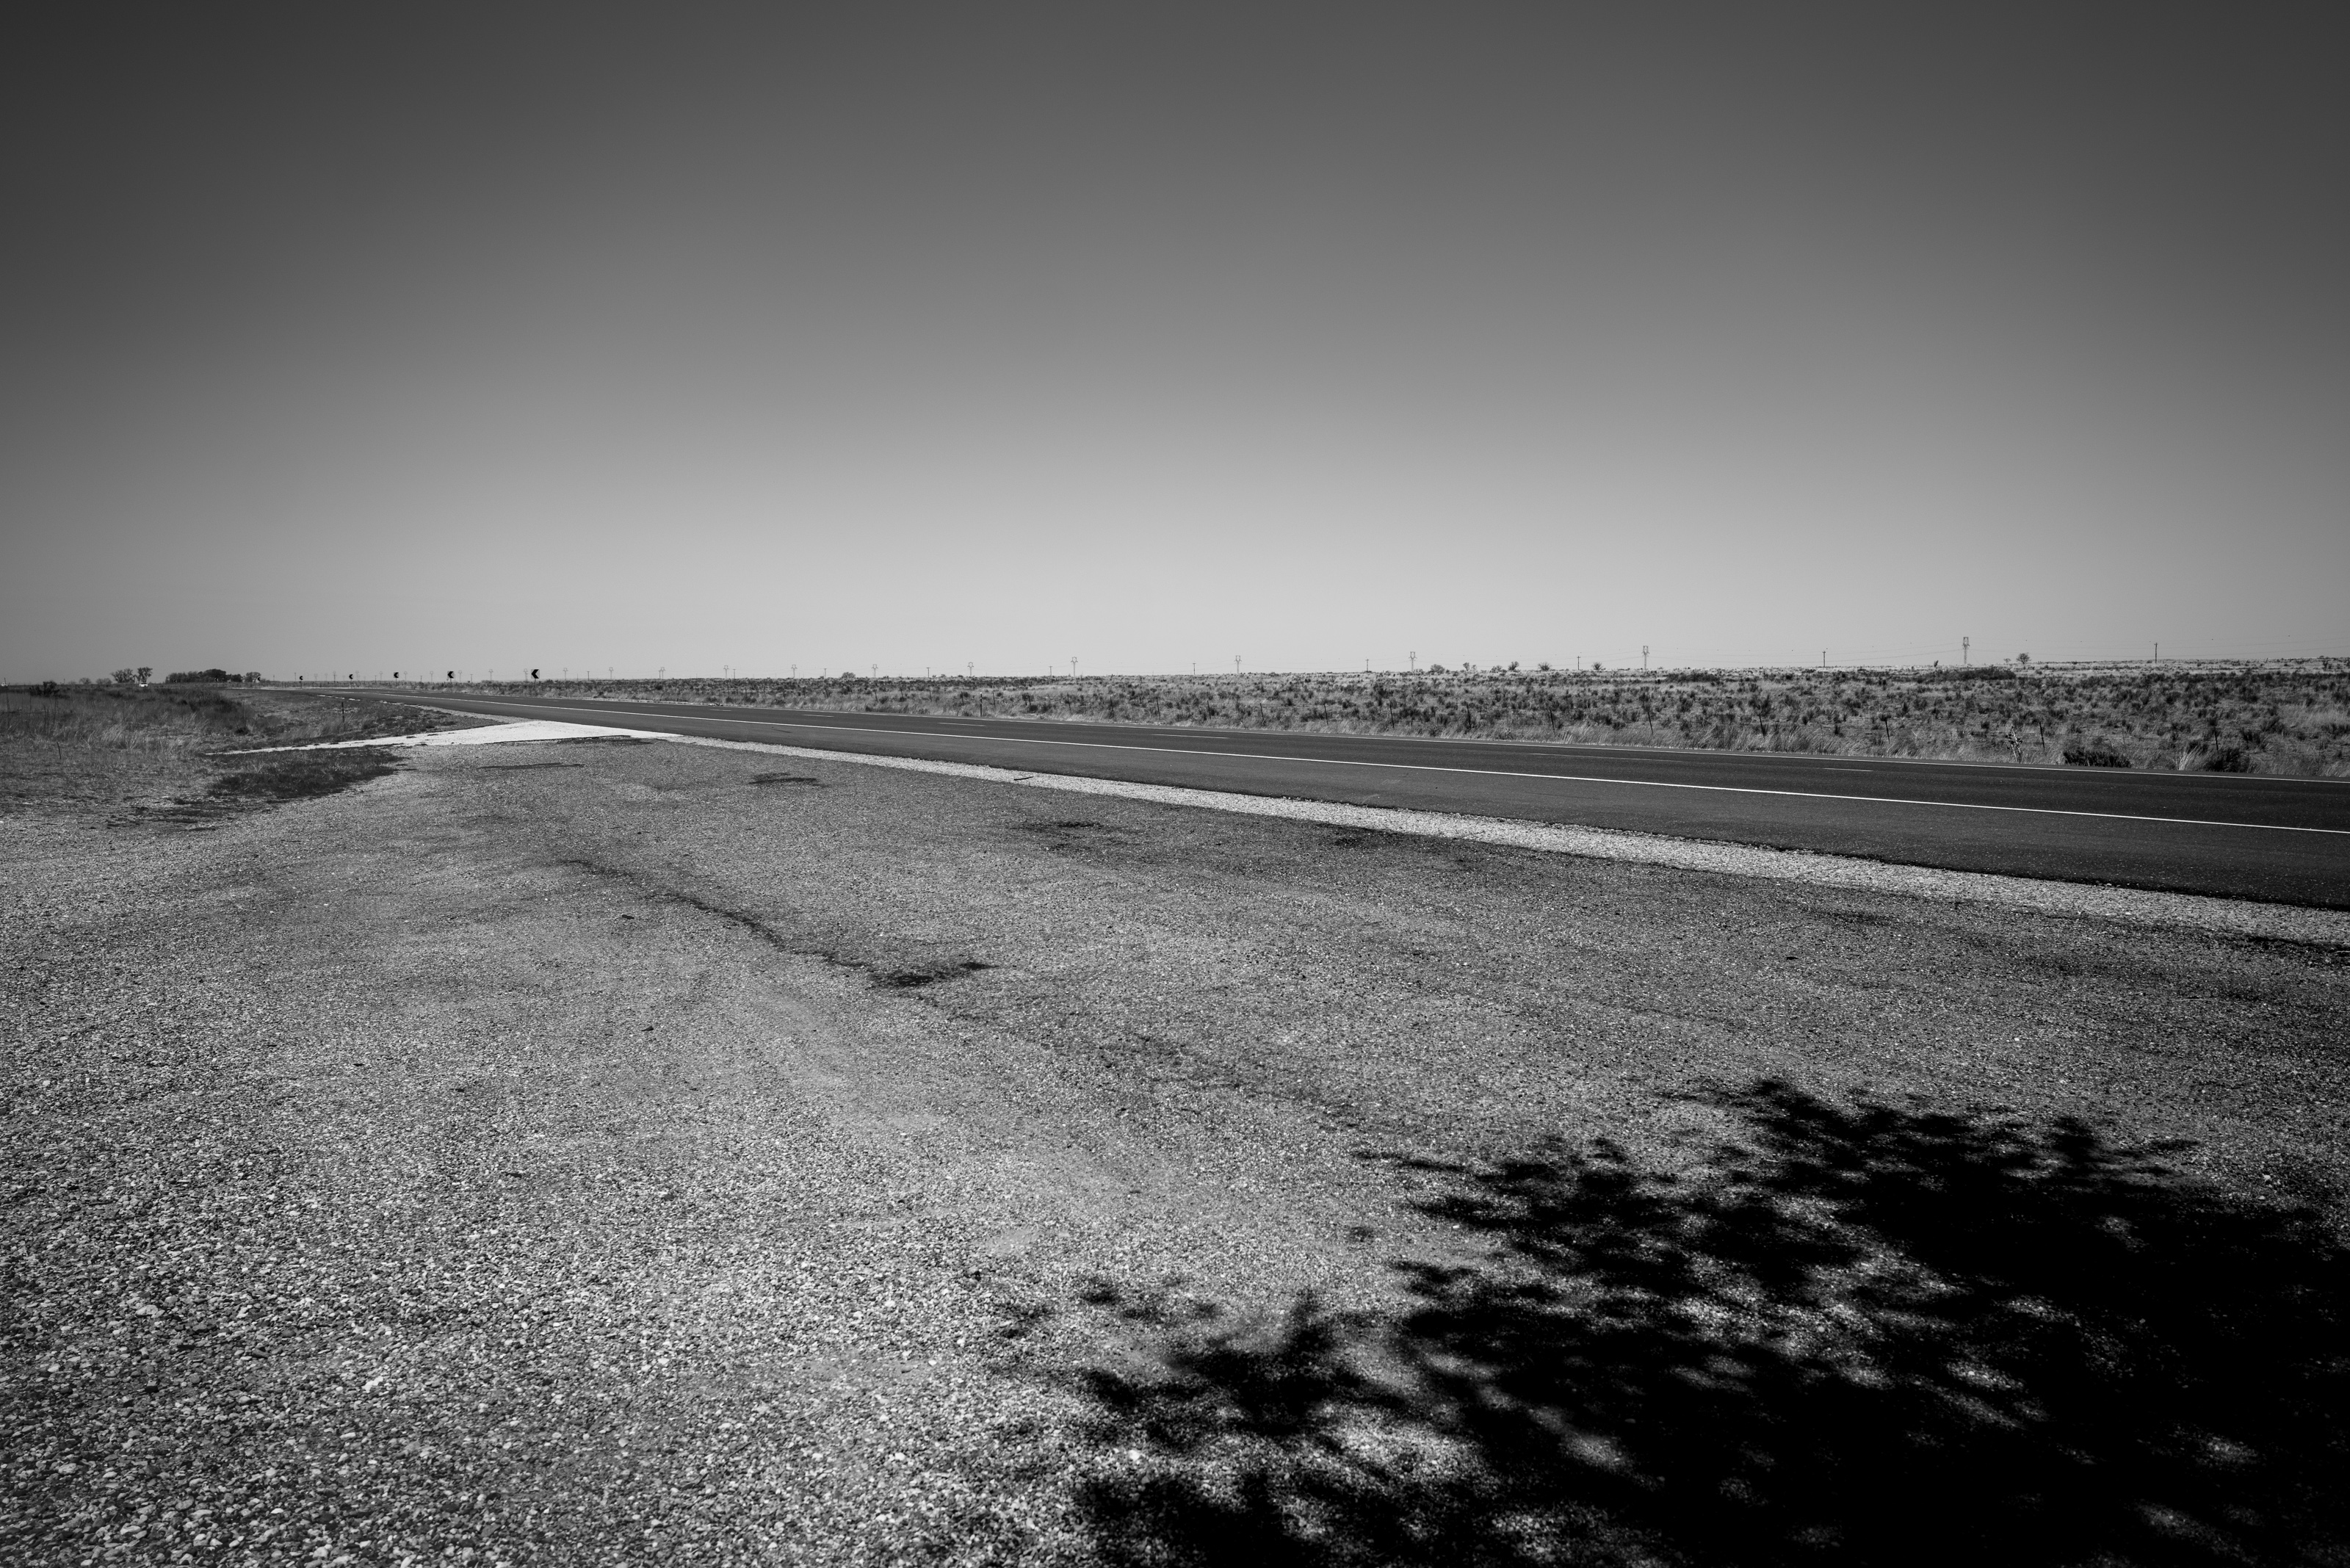
No lens gets in the backpack for a job until it's taken out into the harsh, "real world" and shot for a while. I've got about a month and a half to put it through its paces so I thought this afternoon would be a good starting point. Above and below are images shot with the Olympus 40-150mm f4.0 Pro lens; mostly at f4.0 or, at most, f5.0. 

The lens is small and light; as advertised. It was cost effective at $849. It fits right into the cutout I had prepared for it in my Think Tank case. It communicates and works seamlessly with the Panasonic GH5ii. I think it's going to work out well. See for yourself.

detail from the photograph at the top of the article. 


Sharp at the long end. 


I might give this one a try as the new studio work vehicle. 
It's pretty cute....


Highway photos. The new thing.


 58 miles to Santa Fe, NM. 

Camera: Panasonic GH5ii

Lens: Olympus 12-45mm f4.0 Pro


Thursday, May 05, 2022

One more sample of the APS-C Sigma 18-50mm f2.8 lens on the Leica SL2. Neophyte Landscape and Architectural photographer tries again!


 Church in downtown Santa Fe. Late afternoon. Late April. 


Mismatched gear is interesting. 

Lenses. Some good. Some bad. Some atrocious. Let's talk "sample variation."


Remember that oh so cute and oh so cheap TTArtisans 17mm f1.4 lens I bought for the Leica CL a while back? I really liked that lens and found it to be more than sharp enough once I stopped it down past about f2.5 or maybe f2.8. And it's such an interesting and adorable bit of industrial design too. 

I looked for one when I started buying up new Panasonic GH cameras but they were out of stock everywhere. B&H finally got some more in so I ordered one.... pronto. It came midmorning today on a Fed Ex truck. Lucky me. I'd just finished billing two big jobs and also politely informing a past client why I didn't want to participate in his exciting enterprise any more and I was anxious to finally....FINALLY have time for myself. So I put the lens on the GH6 camera and drove downtown to do my usual walk around the buildings. So much has happened in downtown since I was last there. It had been almost two weeks since my last visit. It was warm and humid and threatening thunderstorms so you know it was just right for me. 

I walked. I ate stuff. I stopped for coffee and coffee cake. I put the camera on manual focus and roamed around. I used focus peaking. Sometimes I stood still and used focus peaking and then the added "assurance" of magnified focusing assistance. Everything looked pretty good in the EVF. I shot raw; just like the pros on YouTube!!! And when I got home I shoved the files into Lightroom and was giddy with the anticipation that I'd get the same kind of results I've enjoyed using the same model lens (but with an L mount) on the Leica CL/TL combo. 

The disappointment hit me like a ton of decaf. When I stop down to f2.8 or f4.0 the center of the frame is sharp enough. Not sharp like it's sibling but sharp enough. But here's the rub: it's only sharp in the center third of the frame. By the time you get to an edge or a corner it's like a carnival lens or a Diana camera lens. The three colors focus on different planes, and it's softer than premium toilet tissue. Even at f5.6 the center is fine and the edges are dog food. But not the good dog food you can sub into a meatloaf or something. Nope, they are as nasty as the edges of bad lenses get.
Shamefully bad.

Shaking my head here since the copy for the Leica is so good and the one for m4:3 is just so bad. I guess this is what they mean by "sample variation." Yuck. My first return of the year?


Mid-Walk energy boost at Cookbook Café.

It's all fun and games until someone oversaturates the skies in Lightroom. Right?


In recent updates to Lightroom Adobe has added powerful masking tools, many of which operate with automatic precision. I love using "select sky" in my quest to "fix" dull skies. Frequently, I go overboard and slam sliders around with impunity. 

Both of these images started life in a Leica SL2 camera fitted with the Sigma Contemporary 18-50mm lens. It's a lens that was designed to work on APS-C cameras. It's small and light and the image circle in no way covers anything close to a full frame sensor. But since the version of the lens I have is dedicated to the L mount it automatically triggers the SL2 to change from full frame to a 1.5X crop. I started using that lens on my big Leica to reduce the size and weight of the overall package. Then I decided I really did like way the files look so I just kept on using it that way.

I shot these images on my last evening in Santa Fe as the last light licked the mud buildings in the Plaza. 
The color in the sky in the top shot is "as shot" and the discoloration in the right hand side of the frame was caused by arriving smoke from the devastating wildfires NM is currently experiencing. 

I used the "select sky" command in Lightroom on a very similar frame and included it on the bottom. Good taste is probably somewhere in the middle but I thought it might be useful to get the "Jerry Springer" approach to color out of my system before moving on to precious things like subtlety and such. 

Just thought I should share my Jekyll and Hyde color management skills out in the open. 


I'm starting a new "sport." I don't do street photos any more. Now?

Untitled Masterpiece # P01312-A 
80 miles East of Clovis, NM.

Now I only do highly competitive highway photography. Anyone can take a Fuji X-Pro3 or a Leica Q2 to a crowded, urban downtown street and, if they work diligently and with true intentions, they can probably get something good enough to toss onto a share site or Youtube. Me? I needed more challenges than mere street photography so I went out for the visual sport where you really have to work, compete, sweat and exert to get anything at all interesting in your frame. (yep. It's all about the highway...)

If you are an urban street shooter chances are you're 50 feet or less from the closest coffee shop and rest rooms are one hotel lobby away. Not out in the highway zone. Nope, if you want coffee you'll need to plan ahead and fill that Thermos with something hot and dark a couple hundred miles back. And if you need to answer the "call of nature" you'll need to step over a rattlesnake or two and go behind a tumbleweed or a tattered billboard. You could just stand by the side of the road and pee but the universe is silly and fickle and you'd probably have the first car of the day pass just at that moment. Followed by a highway patrol car...

Highway photography is going to be the next, highly competitive "visual sport" of the century. While there is no rule book we can make up some as we go. The camera and lens don't matter and phone-genesis photos are just as well accepted as those pictures popping out of an 8x10 view camera. You can learn more in the previous issue of "Obscure Sports Quarterly." It's the very next article after the one on competitive dodge ball....

I'm noticing more and more work by unsung heroes of the blacktop. There are several English practitioners who specialize in overcast roadways bordered with thickets and several Canadians who seem to dominate the art with images constantly included in another little known publication called, "Frostbitten Fingers." It's dedicated to the niche of the highway art that is obsessed with winter roadway shooting. If you want to learn that specialized sort of expertise I'm told you should take a workshop. They generally start by teaching newbies how to shovel off the snow in order to reveal the highway for shooting. It can be quite physical. But the exertion seems to drive greater creativity! It's a Zen koan sort of activity...

I'm relatively new at highway photography. New to the sport of it, that is. If I decide to turn pro I can look forward to all kinds of fun acquisitions. I'll need a tall Mercedes Sprinter van so can I build build a shooting rack on the rooftop. That's so I can get my camera way up off the road for a less "flat" perspective. Points are given and taken away for the creative merits of a homemade roof rack but unless the roof rack can be scored by some objective measure methinks it be a fool's errand. Perchance

I had my first glancing experience with highway-tography many years ago when I happened to be out on West Texas farm-to-market road 13, between Terilingua, Texas and Deathtrap, Texas when my ancient Buick Wildcat had a flat tire. I discovered that someone had borrowed the lug wrench from my car's trunk so I was essentially moored until I could flag down a passing car and ask for help. The only problem being that the frequency of passing cars was near zero--- per day. The eight track player in my car was on the fritz, I couldn't even tune in an AM radio station but I did have a camera with half a roll of unexposed, hand-rolled Tri-X film in it. So I spent some time carefully composing the mix of bubbling tar, mosquitos bigger than my hiking boots and heat waves so festive it was like reality fairies dancing down the road, semi-transparently, in front of me. Heat exhaustion and dire dehydration played a part, I think, in my fascination that day...

There is no doubt that highway imaging can be subtle to the point of being opaque but I'm sure that over the course of several hundred long and detailed blog posts about the subject you'll be up to speed and ready to play along too. You might want to start your education over at the BBC Broadcasting which, on channel 37, carries about 35 hours a week of slideshows of various views of....highways. Along with over the shoulder video shots of working "highway men" pointed their cameras hither and yon in order to entertain what I understand to be a very dedicated online audience of elite aficionados of the craft/art/sport. You'll be betwinkled by some of the wide-ranging interviews with the HCBs and Avedons of the sport. They've got hours and hours of them.

This sort of work takes concentration, incomparable hand skills and much practice. The elite highway photo persons train for hours each day to stay on the razor's edge of fitness. There are pre-visualization exercises, lens changing drills and much more. To see a competitive match between two high ranking pros for the first time is to really understand the power of your own adrenaline. Some of the shooters are so engaged during a session that they can lose up to five pounds of body weight just by sweating. And that's in mild Spring weather in places like Texas. So, of course, physical fitness is a given.

Try your hand at it and remember...if you find the "art of asphalt" a bit opaque and initially frustrating to master (or even understand the rationale for) ...I'll be putting together exhaustive one week workshops to help you hone your craft and develop an initial working style that will put you on your road to professional highway photography. Then you can take my advanced workshop which is all about building your audience. It's riveting. Breathtaking. 

All you need is a camera and a reliable car. To think I spent so many years at a prestigious college just to end up having to learn all this on my own in the school of highway life. The world is full of potholes. Try to be the wheel that dodges them. GAME ON!!!

Untitled study in frame bisection. Vignetting included in the natural course of the process. 
Keep you cup holders at the ready.

So glad to see some parts of photography finally moving from craft to sport!!!


Monday, May 02, 2022

The thrill of editing and post processing. What a nifty way to compare lenses and camera systems. Especially for use in dicey situations.


 Corporate meetings and events can be fun and even challenging. Some parts are basic social intelligence. Getting people to pose at cocktail receptions, and cajoling CEOs into happier expressions without stepping over the lines. There are the uncontrollable parts of the events where you might follow along on an off road adventure or an art gallery tour and try to capture people authentically having fun while mostly disregarding the fact that they have a photographer in tow. And even though it seems like the predictable and easy part I always find the "speakers at the podium" to be challenging. 

There are two reasons for this. First, you are dependent on the lighting provided by the stage designers and A/V crew. As a photographer I'm happiest with big, soft light sources but you won't find them on most conference stages. Instead you'll find spot lights from the back of the ballroom or maybe assorted open face lights on a truss out in front and above the stage. If it's the former, which is pretty much standard at smaller venues (think 300 attendees instead of 3,000), you can count on the lights being right on the edge of acceptable for overall photographic exposure. 

Add in a speaker with a sensitivity to strong lights, one with the clout to demand that the lights be dimmed down, and you have an interesting session of podium-tography on your hands. And if the lights don't get you the rapid blinker speaker lurks out there. And the stage pacer. And there's always the note reader who spends his or her whole time on stage looking down at their notes and, erratically and briefly tries to make glancing eye contact with one or two people in the audience. Then there are the "rounds".  The easiest big room to photograph in is one with theater seating. Rows and rows of seats on ever ascending levels. But the "rounds" seem to be the preference for hotels and convention centers. "Rounds" refers to round tables that seat eight. The banquet people put them as close together as they can to maximize the number of attendees they can put in a ballroom. Of course sitting at round tables means that half the people in the room have to turn their chairs around to see the stage. It quickly becomes a mess of stretched out legs and chairs in the aisles. An obstacle course for the photographer who needs to move around the room to get good vantage points from which to photograph the speaker on stage. 

If the event photographer is especially lazy and well equipped I guess he or she could set up a big tripod at the back of the room, centered, and shoot with very fast, very long lenses. That gear and a comfy chair might seem the way to go. I resist it because if photographers use too long a focal length lens from too far away the smashed compression makes all the photographs look flat and lifeless. I like to work at multiple distances from a speaker to get a collection of images with different apparent depth. It just seems more interesting. 

Much earlier in my career as a corporate event photographer I was nervous about getting great photographs. When we used film cameras the whole system was very slow. You really could only count on film with ISOs of up to 800. And you pretty much had to nail your exposures. And you had to re-load after each 36 exposure dose. Of course you would probably be rewinding film just as the CEO sprung a big "reveal" on the audience. Hope that second camera still had some frames left, right?

Now, with digital camera systems and some decades of experience under my belt I am no longer nervous about getting "the shot." I see things differently now. Nothing is really that big of a deal anymore. Most of my clients who have survived the last recession and the Covid shutdown have been desensitized to self-induced stress. They just want to get "representative photos" that "give a sense of the event." 

I see conferences with day long speaker components as a fun and lively testing ground to see what different lenses and cameras, and formats can do when presented with consistent lighting and subject matter. Last week I staged three different cameras on a chair at the back of a big ballroom. I'd find a nice angle for the speaker on the stage, grab a camera and shoot some frames. Then, since most presentations are about 30 to 40 minutes, I had ample time to circle back to my "camera hoard" and change out models or lenses or both.

Over time one system presents itself and the "right choice." But perfection for all frames isn't necessarily what I am pursuing. I like to see where the limits are for each kind of system and what kinds of compensation come with faster lenses or different shutter speeds. Can I get close to the quality of a full frame camera with a long zoom if I use a smaller format camera with a shorter, faster lens and get closer to the stage? Stuff like that. 

Last week we had two days of presentations and speeches. And it was actually very interesting to me because the conference was all about banking and economics. I had breakfast one morning with the keynote speaker who, like me, was an early riser and ready to hit the breakfast buffet at 6:45 a.m. Since we were the first ones there we had time for a pleasant half hour talking about things like secondary derivatives and black swan events....

When the presentations on the stage started in the "main tent" I went for the "safety system." The safety system is the camera and lens(es) that you KNOW will get the job done in the most commonly acceptable way. The Panasonic S5 is my low light champion. I can photograph at ISO 6400 without a worry in the world. If I know everything is going to the web and nothing will touch paper and ink I'm just as happy at 12,000. I use that camera mostly with the 70-200mm f4.0 S-Pro lens. It's sharp enough to shoot wide open all the time and the range is great. From a head-to-toe shot to a fairly tight head and shoulders shot at a comfortable distance from the stage. While I can use the camera in a "silent mode" I always experiment to see if the production's LED lighting is going to cause banding. If the electronic shutter initiates banding I quickly retreat to the mechanical shutter and try to be conservative in my frame rates.

Once I know I have good expressions and a good range from a speaker at the podium while using the "safety system" I think throw caution to the wind and grab a different camera and lens. Next on my dance card one morning last week was the Panasonic GH6 with the Panasonic/Leica 12-60mm. With that camera I am comfortable at ISO 3200 and I also mostly shoot that combo with the lens aperture wide open. After I got bored with that I switched to the GH5ii with an adapted Nikon 105mm f2.0 lens. And then the new Olympus 12-45mm. Finally, I put the 90mm f2.8 Sigma lens on the Leica SL2 and played around with that. This went on for most of the program. 

All the images were shot as raw files to one card and small, 16:9 Jpegs to the other card. 

I got home yesterday, had a lovely dinner with B. and B. and then got a great night's sleep. I need one more good sleep to feel back to 100%. But slower recovery comes with the miles... not the miles on the car either...

This morning I sat down in front of the office computer and loaded in all of the raw files to Lightroom. There were 2900+ to start with. This represented three days of shooting plus some "atmosphere" shots from around the town of Santa Fe. My first task was to edit down the "take" to 2,000 files. When I couldn't find any more that I wanted to throw away I stopped and got busy fixing the surviving files for general use. 

First I set the color profile. Then I set the exposure. Then I tweak. Then I apply the settings to all the shots with matching parameters. Once you get a good flesh tone on a stage where the lighting is set in stone you can forget having to nurse it from frame to frame and just apply that color temperature and hue setting to every image of a human in the big folder. 

I don't usually add any sharpening to these event files. Most of the presenters and the general audience "victims: of candid photograph from receptions and events are not 20 year old fashion models. The demographic is resolutely "over 30" so, in fact, I generally turn the sharpening down from Adobe's preset. 

How did it all work out this time? Well, as you might expect, the S5 dominated. But the SL2 with the 90mm could be impressive when it actually nailed the shot. The GH6 is a big step forward in terms of detail and lower noise when I compare it to past samples from the GH5. And the GH5ii came in right where I expected it would. It's the replacement for the G9 in my mind. 

While I notice differences in all four of the cameras the truth is that with a more careful and deliberate approach to shooting we could make any of these systems work and provide images that our event clients would enjoy and be happy to work with. 

The one tip I rediscovered was something I used to know when shooting with flash but forgot because it's been so long since we've shot a job that required some on camera flash. If you set your camera to TTL and your flash to TTL but you leave your ISO setting at AUTO the system will default to ISO 100 and underexpose your shots. Especially obvious if you are trying to bounce small flash off a very high ceiling. Set the ISO at something like 1600 or 3200 with an S5 and you'll have a great time shooting with flash. 

Since someone will certainly ask I thought I'd answer this one: If you have stage lighting at your disposal why to you need to shoot at high ISOs? The answer is pretty easy. Speakers move around. They "talk" with their hands. They pace. I find that 1/160th of second is the lower limit I want to use to freeze subject motion. With an f4.0 lens that means you'll need somewhere around 3200 to 6400 ISO to get a good percentage of shots that are not marred by subject motion. All the cameras and lenses are well enough stabilized so that actual camera shake is rarely a concern. 

I've spent my day editing the images from the raw files and am now uploading the results to a private gallery on Smugmug.com. I'll also send along a large WeTransfer.com folder to the client so they can archive their images locally. It's all part of a process. 

Just for a change I'm photographing two attorneys tomorrow and I'm purposely disregarding all the gear I used in Santa Fe and taking, instead, the Sigma FP and the Sigma 85mm f1.4. It will be a nice change of mindset. Divorced from the idea of driving long distances in the car. 

Now packing for tomorrow's adventures.