Showing posts sorted by relevance for query LED. Sort by date Show all posts

Monday, May 07, 2012

WAA. WAA. LEDs can't be good until they are over 90 CRI. Oh yeah? We've got that right now.

I know, I know.  You tried a tiny little battery powered LED panel a few years ago and it didn't put out enough light and the light it did put out needed to be color corrected.  That means they'll never, ever change and you'll never have to consider LED lights ever again. Ever.  Cause nothing ever changes.

Sadly, reality is about to intrude into your lighting world view.  I was researching new products from notable manufacturers and I've found that there are a number of new LED lights that are just now hitting the market and they've all crested the 91+ CRI threshold.  That means they are getting close to pure daylight rendering in imaging applications.  One of the companies I watch is Lowel.  They've been making lights for still photographers, movie makers and videographers for decades.  Their founder, Ross Lowel,  wrote a great book on lighting called, Matters of Light and Depth, which I've read through so often the pages are raw. (He was a cinema lighting pro).

Lowell jumped into the LED market with a small panel that blended lights between tungsten and daylight just a couple of years ago.  It's called a Lowel Blender.  It's a small light that mainly used camera mounted by electronic news gathering, ENG (read: video) guys but also, increasingly, by cinematographers.  It's metal, tough as nails and bright for the size.  Turn a dial to go from 3200K to Daylight, or anywhere in between.

The engineers at Lowel bided their time until the LED bulb makers started supplying the markets with higher accuracy bulbs.  Their new Prime(tm) line are all rated at 91 CRI (Color Rendering Index) which is a gold standard for professionals in a number of imaging fields.  Here's the webpage for their Prime(tm) panels: http://www.lowel.com/prime/

In one fell swoop the folks at Lowel have vacated the one niggling problem with the previous generation of under $2,000 panels, the tendency to have color spikes or a color cast that photographers needed to correct for best results.  The lights are available as either tungsten fixtures of daylight fixtures and feature a 50 degree light spread angle.  The chassis are all metal and have a functional yoke system for adjusting them around one axis.

The lights are available as 200 bulb fixtures or 400 bulb fixtures.

The interesting thing to me is how the improvements came about. I don't mean the engineering but the marketing that drove the engineering.  We creative people think that we drive the industries that we buy from but apparently nothing could be further from the truth.  When I spoke to a product manager at Lowel I guessed that movie and video professionals demanded better performance and that led to the development of more color correct LEDs.  The real story comes  from the retail sector.  Apparently major retailers found out that higher CRI lights made products look much, much better than the typical mixed store lighting.  They're the ones who started demanding better and better color performance.  It started in the higher end retailers and it's relentlessly trickling down into the mainstream, big box stores.  It's all about retail sales.

Humans like to see colors clearly and cleanly and marketing tests showed increased wallet response from consumers under improved light sources.  We benefit from the big store's massive retail buying power. But Lowel isn't the only manufacturer who will incorporate the new technology.  I'm sure that current bulbs with lower CRIs will be phased out as economies of scale come into play and the new bulbs will become an industry standard.  Give the science guys five more years and every LED will approach 100 CRI.  Except my own custom LEDs.  They're 110 CRI. (just kidding, the scale only goes to 100).

You can find out more about LED lights and applying LED lighting to still photography, here:  The Ultimate LED book for photographers. 


Need to know more about lights and lighting equipment in general?  You could do worse than to pick up a copy of the Lighting Equipment Book......


To see a wide range of LED product that's pounding and stomping into the general photo market check out B&H's website (no affiliation).  Try here: http://www.bhphotovideo.com/c/buy/LED-Light-Sources/ci/12248/N/4294551085  Warning, there are many, many pages of LED light/candy to look at...


Wednesday, February 03, 2021

Remember when a good light lasted forever? Welcome the age of ever improving LED lights and their rapid obsolescence.


 When I learned photography we all used the same "kind" of light. It was electronic flash. While some were better constructed than others or had features such as faster light burst (shorter overall duration) most of them worked in pretty much the same way, and outputted very similar light. There were differences in studio electronic flash equipment which mostly centered around the way different makers handled excess UV output which could cause some color issues. But once we hit the early 1990's UV coated flash tubes became the rule rather than the exception and a good worker could expect pretty much the same results (in terms of color accuracy) from a wide range of products. The nice thing about consistency across product lines was that there was no logical impetus to rush out and buy a new generation of lights every few years. If the lights did what you needed (mostly giving you the right power and recycle times) you would not see qualitative differences between this year's model and the lights you bought 10 or 20 years ago. You could mix and match with abandon. A change to a new system didn't demand a new working methodology, instead it usually just required changing speed rings for mounting modifiers.

The progression of LED lights has been a bit different. Well, a lot different. 

The first useable (for photography and video) LED lights were panels that didn't have very high output and had some glaring deficiencies in their color output spectrum. Early LED fixtures were designed around the only cost effective LED light units then available which were the small, 1/8th inch diameter "bulbs." In order to get enough power out for a workable lighting fixture the manufacturers had to group hundreds or thousands of the small bulbs together onto panels. The panels were big, heavy and, even with over 1,000 bulbs on them, not really bright enough for a lot of different applications. 

Since the panels were big you couldn't practically use them in soft boxes or mount umbrellas on them so modifying the light coming from them required photographers to adapter lighting methods cinematographers have used since the dawn of movie time. They had big diffusion panels set up in front of the LED light fixtures, and each panel had to have its own light stand and attachment gear. It wasn't until LEDs built around Chips on a Board (COB) were made in a form that was similar to a flash monolight that photographers could directly mount umbrellas and soft boxes on them.

But the big issue, and the thing that fueled a legitimate upgrade enthusiasm is that every few years the actual spectral accuracy of LEDs improved, and continues to improve. Those improvements have a direct impact on the quality of the lights we use to make photographs. And with each generation it became possible to make the LED lights more powerful.

People in general are very sensitive to color accuracy in portraits and this is a field where the improvements in parameters like red response and overall color balance had the most effect.

While CRI is a kludgy measure of non-continuous light color accuracy it is a measurement standard we've had in place for a long time and it's a good, blunt tool for discriminating between generations of fixtures. 

My first LED panels had a CRI rating of 83. They needed to be filtered, and the resulting files needed to be worked over in post processing. They were deficient in the areas that most affected portraiture so, as  you can imagine, each improvement in those measurements has led me, like Pavlov's dog, to trade up to the newest tech. 

Three or so years ago Aputure put out a product line called, "LightStorm." I bought their big panels as their rated CRI was around 93 and the upgrade over my previous lights was pretty amazing. Portraits were easier to finish out and the new fixtures were a much easier match when mixing in daylight. I liked them enough to also buy the half height models, the LS-1/2. Since all of these lights were panel designs I still had to pack twice the number of stands as there were lights in order to use modifiers with everything. But the color issues were mostly resolved. 

Recently Aputure, Godox and a number of higher end makers have turned their attention to making more accurate COB style LED fixtures. These have small (think 1.5 by 1.5 inch) output devices which makes them as convenient as traditional flash monolights to use. Most have a Bowen's mount which means you can mount an endless inventory of soft boxes, octa-boxes and similar modifiers at will. Most have fan cooling to ensure reliability when using on-light modifiers. And the newest versions are now rated with CRIs that are very, very close to daylight. Almost all boast CRI's above 95. The lights do well with other, more stringent light measurement standards as well. 

So, unlike flash gear, upgrading isn't just a result of boredom or the desire to have a different internal triggering system; when doing most upgrades from older LED products you'll likely see big improvements in overall color accuracy and overall spectral balance. 

The best lights currently on the market are also remarkably consistent in the magenta/green output which means they are easier to mix and match across brands. 

My Aputure LightStorm LED lights are exiting the studio today. They've been replaced by a small flock of Godox LED lights, all of which are the non-panel variety. They are the contemporary, continuous light version of the standard monolight configuration flash photography uses. I can use them on locations without having to bring extra frames and light stands for modifiers. They are sturdy and easier to pack. 

The models I've purchased all have the power supply parts internal to the light fixture so I don't have extra control boxes or power converters hanging off stands. I have fewer cables of which to keep track. It's a net improvement in logistics but the big payoff is: higher CRI and TCLI ratings for more accurate color. 

Four light units are leaving today. They've been good, reliable fixtures. I hope they go to a good home. 

It's more interesting to consider upgrading for rational reasons rather than having to justify intangibles. It makes for a more emotionally comfortable transition. Better color is generally always a better choice. 

Back in the days of electronic flash the only compelling reason to upgrade, after a certain technical quality level was reached by strobes, was to make your location package smaller and lighter or, conversely, to make your studio light more powerful in order to better handle the combination of slow films and large format cameras. The old ways; f64 @ ISO 64 and be there. It's totally different now. 

We are almost totally LED here. We have some vestigial flash gear but nothing like we used to keep on hand. That's nice. No more waking up in a strange hotel in the middle of the night anxiously wondering if you had packed the sync cords. Or extra batteries for radio triggers....

Saturday, August 22, 2020

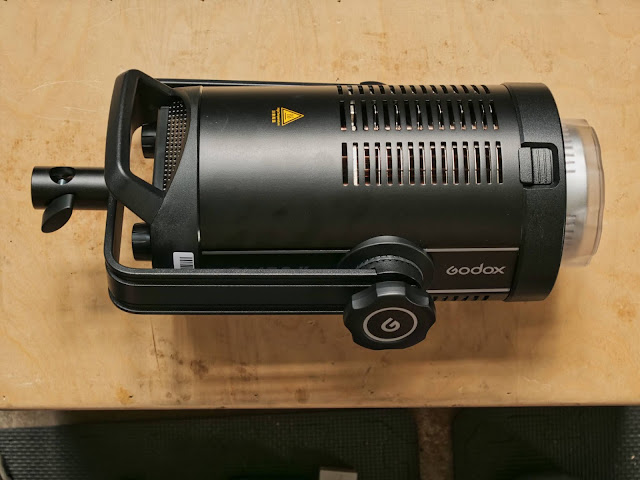
New Light. I like it. Godox SL 150 II.

This is the heavy, rugged and highly desirable (by me) Godox
SL150 ii. It's a COB LED light with features.
Daylight balanced.

Obviously much attention was paid to cooling. Note the vents on the all metal chassis.

The back panel is straightforward and has a special button (the white one)
that changes the power ranges to turn off the fan. It also comes with a very
simple remote control that only turns the output up and down.

Much attention was paid to heat management. The fan isn't very loud.
It's only noticeable in very quiet rooms. Note also the robust yoke style 
stand connector and the umbrella connector on the bottom. 
Nice. 

I wrote a book about LED Lighting for Amherst Media. It was published in 2010. That was ten years ago. 

LED fixtures for photographers and filmmakers were pretty primitive at that time but I saw a lot of promise, even with what was on the market back then. I purchased a bunch of different LED panel lights and used them for lots and lots of projects, and I could make a good argument that LEDs were useful for nearly all studio still-life projects and for most videos.

At the infancy of the LED revolution for photographers LEDs were plagued with two major faults. First, unless you spent thousands and thousands of dollars on a single light (I didn't) you were going to get lights that had poor color rendering with spikes and deep holes across their color response. This would never have worked for people working in color with actual film but it was possible with digital cameras because you could do custom white balances to cover most of the sins of the lights. If you could measure where the biggest dips in color response occurred you could go a long way towards helping out your lights by finding/assembling filter packs that helped pump up the lost parts of the spectrum.

But that was time consuming. And expensive. And robbed you of many photons.

The other fault of most lights was the fact that their output (sheer level of lumens) was nothing to write home about. I had several big panels that each had over 1,000 individual LED bulbs set in rows up and down and across the panels. But even with several big lights I was hard pressed to get enough light on a subject to shoot, say, a portrait of an active person. If they sat stone still and I could use a tripod and drop the shutter speed way down I could manage but if the person I was photographing was animated and moving then all bets were off. 

One measure of color accuracy is called CRI (color rendering index). My earliest lights measured between 81 and 85 CRI. All of my current lights are billed at CRI 95 or higher. There are other, more exacting measures but this is a good place to start. 

Each successive generation of LEDs made for photographers and film makers has just gotten better and better. And more and more powerful.

Probably the biggest breakthrough was a technology called COB (chip on board) which moved LEDs from a collection of big, discrete lightbulbs spread out on a panel to a single, more concentrated light source that acted more like a focused light than a soft, panel light. These new LEDs generally have a light source that is flat and anywhere from an inch to an inch and a half across. All of a sudden we had lights that acted, in terms of size and beam spread, far more like our traditional, monolight, electronic flashes. 

The Bowen's flash/modifier mount quickly became the "standard" of most makers of economical COB LED units and let all of us working stiffs use the reflectors and speed rings that we were already using on a wide range of flash equipment. Now we can make use of soft boxes and umbrellas in a way that large, flat panels didn't allow. 

My first COB lights came from Fiilex. They were small and not the highest output but it was obvious that they had mastered, to a much greater extent, color accuracy. 

I have owned many other COB LEDs since then, all with Bowen's mounts on the front end. I kept selling them off as newer, more accurate and more powerful lights came to market. 

A year ago I bought three lights from Godox called SL60s. They were the same kind of design style as a monolight flash but all LED. They had 60 watts of power output which was supposed to be the equivalent of a typical tungsten light fixture with a 300 watt bulb. But reality rarely matches conjecture physics....

The SL60s are a great adjunct to four of the Aputure LightStorm LED panels I own and it's really nice to be able to use them quickly, along with modifiers like soft boxes or octabanks. I used all seven of my mix of LED lights  (not counting small, battery powered, on camera-type versions) on my recent shoot at a technology lab and I came away from the shoot wishing I'd had one more higher powered COB LED to provide a giant fill or to use through a window to mimic sunlight.

I started researching what's out in the market right now and came across the Godox SL, FV, and VL series lights. The SL is a traditional COB that runs only off A/C power and provides a fan cooled light fixture with a Bowen's mount and nice controls. It also allows you to turn off the fan and run the light in a lower power mode for close-in video work were good audio is critical. The FV is also a non-battery light but it combines LED illumination and flash (it uses the LED as a flash source so it's not quite as powerful as a much smaller hot shoe flash).  The VL series is the product line that goes toe-to-toe with the Aputure 120D and 300D lights (but at half the price). It uses a three piece power set up that also allows one to use professional video batteries instead of just A/C power. But the VL lights have the separate boxes and cables for the power supply and the control box which take up so much visual space...

There are different power levels available through the product lines. 

Most of my use of LEDs is in studio or on locations that have ready access to power. I was most interested in getting the best mix of light power, price and usability. I went with a traditional SL150 ii. I thought long and hard about the more powerful lights but you gain, in most instances, a bit less than one extra stop of light while you pay for it in dollars and weight. I'd rather have two reasonably powerful lights than one big, monster light. 

The new light arrived last week and works perfectly. It's more efficient than the generation of SL60 lights so it actually puts out more than double their output. The new, faceted reflector is also more efficient. The kit came with a longer-than-usual, and thicker, A/C cable as well as with a set of four way barn doors, complete with a grid spot attachment. Useful for many video lighting situations. 

The power output is both prodigious and accurate. In a large light bank, used five feet from a subject, I'm getting a meter reading of something like ISO  250, f5.6, 1/80th of a second. 

We'll be lighting a live broadcast show in the next month and several of these in good soft boxes will make great key lights. I'll supplement with the smaller SL60's in smaller boxes or used directly on backgrounds. 

This light even has enough output to be used as a mild/weak fill light in full sun. But just barely.....

As I add more powerful LEDs to the inventory I find less and less use for flash. We'll see how it all pans out. 

I'd love to have an even more powerful light in the toolbox but I doubt I'd get that much use out of the difference. 

Fun with lights! KT

Monday, November 30, 2020

Come on Tuck. That light's not going to light itself. Well, actually it did. Buying more lights is NOT crazy.


 It's funny to me when I look around the studio and notice how few electronic flashes of any type still live here, and at the same time how plentiful LED lights have become. Flash used to be the "work horse" of any photographic studio and, after cameras and lenses, it's where most commercial photographers tossed their money. But then 2010 came along and changed everything. 2010 was the year mirrorless cameras really started showing up on people's radar but it was also the year when the market started to deliver an accelerating deluge of LED products of all stripes, sizes and prices. 

One photographer even was commissioned to write a book about LED photography for photographers, a little more than ten years ago. It was published in early 2012. You can learn more about that book here: 

https://www.amazon.com/LED-Lighting-Professional-Techniques-Photographers-ebook/dp/B008Q0Q8CA/ref=sr_1_3?dchild=1&keywords=LED+lighting+for+professional+photographers&qid=1606759468&s=books&sr=1-3

I'm not suggesting that you run out and buy a copy because everything has changed in the markets and the information space in the ensuing almost nine years. Three or four lifetimes in LED world. Yes, everything has evolved.

At any rate LEDs have become pervasive in the imaging world. On movie sets. For TV production. In the equipment lists of every videographer. And in the studios and equipment cases of an ever growing number of photographers. Even the ones who don't make videos.

Early on there was a demarcation between lights with great color and lights that were cheap. That boundary has pretty much vanished and now we're concentrating more on power output and features. Almost every light being pressed into professional service has a CRI (color rendering index) or 95 or better and does a great job of hitting their color temperature targets. Earlier lights depended on a panel implementation because the lights were made powerful enough for work by using hundreds or thousands of smallish bulbs spread across the panels. 

Panels work fine and I have four Lightstorm panels that do a nice job ---- except a panel has a big spread and it's difficult to get hard edge effects. Also, if you want to use good modifiers you'll probably need a two light stand set up. One stand for the light and a second one for the modifier. 

COB, or chip on a board, LED lights started to become affordable about five years ago and were made insanely popular by the Aputure 120D light which used a 1.5 by 1.5 inch COB LED and featured a Bowen's mount. Even at over $650 it sold briskly and there's now an "improved" model.  The LED/COB tech basically took the spot where flash tubes used to sit on lights and allowed for the use of the same modifiers and reflectors that most people were already using on their various flashes. 

I'd been buying more expensive lights from Aputure until I found the Godox SL60W which is a no frills COB light, rated at 60 watts, is daylight balanced and uses Bowens accessories. It's also really cheap at around $130. I wrote about these lights a while back and I like them so much I bought three. I use them all the time. Literally, every day. If not for work then for lighting up stuff around the compound.

The three SL60W lights and the four Aputure Lightstorm panels were working for me until I did a job back in August for a bio-tech company, at their headquarters. I needed to light up a 5,000 square foot laboratory and I did it, just barely, and by the skin of my teeth. At that point, and anticipating more work from the company (which arrived last month), I decided I needed to bolster my LED collection with some more powerful lights. I came across some good reviews of some new Godox products by Vlogger, Gerald Undone. Here's one review that's on topic: https://www.youtube.com/watch?v=DbBN_b7OGec 

I watched his take on a new generation of Godox COB models and assessed how his results applied to my needs. I don't need battery power or fully silent lights but I can be parsimonious so I decided to purchase the SL150Wii. It's an update from a previous model and provides a mode whereby you can work at a reduced power output but are able to turn off the cooling fan entirely. The light is sturdy, fan cooled and plugs into wall sockets and runs off AC. The light belts out a good deal of clean illumination and seems to fit in well, color-wise, with the rest of my LED inventory. 

The light comes with a faceted reflector that makes it very efficient at delivering a lot of lumens. There's a dial on the right side of the rear panel for power output and also a switch to go into a lower power/fan-less mode. On the left side there's a switch to enable special effects and a dial with which to choose them. Think: Lightning strikes and emergency flashers (albeit with only white light). The light also comes with a remote control which allows you to raise and lower the power levels of the light without having to access the rear panel. 

The light is rated at 5600K and does not have a sister model to provides multiple color temperature settings. 

A week after I received the light (which I ordered from and paid for at Amazon = no freebies! No sponsor!) I had my second multi-day engagement with the big bio-tech company. I used the new, big Godox mostly by bouncing it off the high, white ceilings to provide overall illumination in big rooms while filling in and accenting my subjects with the less powerful LED lights. It worked very well and we breezed through two days of shooting "What you light is what you see." stuff. Adjustments to the lights, made by an assistant in real time while I observe on a hand held monitor, was a great way to work, giving large amounts of control.

But, if one big light is good then two big lights is better. When I bought the first light it cost $349. This weekend I decided I might really want that second light so I headed back over to check on pricing and availability. They were on sale for $279. Having had nothing but great experiences with the first one I was happy to click "yes" to a second one. Especially at 25% off. 

The SL150W/ii is not a powerful enough light to offset the sun outside but it's a good balance of size, weight, price and power for indoor photography shoots, and just about any sort of video production. With two of them bouncing off high, white ceilings I feel like I've got more options to play with in large spaces. If I push them both through a couple layers of white diffusion, stretched across a six foot by six foot panel frame, then I've got some really beautiful lighting. 

While I wait for the second light to arrive I wanted to photograph my first SL150wii for this post and it was already set up on a C-stand with a white umbrella in front of it. I pulled a 4x4 foot piece of foamcore and held it at the back of the product and just out of frame and took a few shots with a tripod mounted Sigma fp. In effect, the light actually did light itself. All of the light on the product camera from the product. Pretty cool. Very easy. 

I'm not suggesting you rush out and buy an SL150Wii. I just wanted to share why I like the light and why I wanted a second one. Forward, into a mostly flash-less future.

Monday, September 24, 2012

LED Lighting. My first choice for studio still life projects.


As you may or may not know I wrote a book about LED Lighting for photographers that was published this past Spring. Naively, I expected the book to be the hot seller of the season.  After all, who won't want to read an "edge of your seat" thriller about the promises and perils of the coolest hot, new lighting trend of the decade? Well, as it turns out photographers are more like stamp collectors and model railroad train hobbyists than they are adventurous revolutionaries. While the vast majority of reviews are five stars, and people who've actually read the book love it, most people keep looking for yet another iteration of a book on... How to Make Happy Light with a Battery Powered Flash... (can we all say, "been there, done that. and the t-shirt was lame?).

I've given seven or eight speeches and demonstrations about LED lighting and I guess I'll have to admit that I'm not a fiery on stage evangelist. I think my big marketing mistake was showing off the lights by using live models. People. The average photographer has worked hard to become comfortable shooting family and friends with his reliable electronic flashes and is loathe to learn new tricks if he or she can help it. But, I'd like to try a different tack in both selling my book and the general use of LED lighting------it's the best thing yet for anyone who does still life photography.  No long explanation, rather it's really just a matter or what you see is what you get. Or, what you light is what you get.  Good quality LED panels have never been cheaper, easier to use or more visually reliable. I still believe they are the game changers in the lighting space, going forward.  And with the special secrets revealed only in my book or my two week long, $15,000 workshop you too can learn the.......

I'd like to formally request that, if you have been a long term reader of the blog, you consider ordering a printed copy of the book. Even if you never decide to pull the trigger on purchasing a single lighting panel you'll have the knowledge to at least convincingly attack the whole folly of everyone else's adaptation of LEDs... And you'll make me happier into the bargain. But, if you shoot food, still life or studio work, and especially if you are dipping your toes into the world of DSLR video I think you'll be amazed at how fluid and easy LED lighting can make your jobs.  And, of course, your book club will thank you for introducing the drama and power of LED Lighting: Photographic Techniques for Digital Photographers, to them....

Below is a quick tutorial about using LED lights to photograph an old, folding Kodak camera. It goes like this:  "set up camera. set  up two lights, one on either side. turn on lights. play with positioning until the effect looks good in the viewfinder of your taking camera. Push shutter button.


 An in-depth look at the very complex lighting set up.

By using an EVF endowed camera I was able to pre-chimp the entire shot, from comp to exposure, to color balance, without looking away from the finder.

If you are interested in dipping your big toe into the LED waters and trying out the promise of the future I recommend one inexpensive lighting unit about all others. It's is the Fotodiox (or similar OEM) 312 AS.  The output is great. The color balance is infinitely adjustable between 3200 and 5500 and the whole fixtures output can be controlled with a simple rotary control on the back of the unit. It comes with two rechargeable lith-ion batteries and a keen carrying case. It's about $160 bucks.  But if you have to choose get the book first.  It doesn't have three easy steps to losing weight or making new friends but it is the first book on the subject on the face of the planet......


Sunday, January 06, 2013

A Quick Project Done on Green Screen with LED lights.

I got an e-mail from Will Crockett today. Will and I met several years ago here in Austin and I've written a few articles for his Smartshooter.com website. Will was a Canon shooter when I met him and he lit all of his work with Elinchrom electronic flash units. He's a good teacher. But lately this long time pro has gone through a huge change in his gear preferences. He's abandoning all of the traditional DSLRs and flashes and embracing (whole-heartedly) two recent camera and lighting trends that we've been talking about here at the Visual Science Lab for the better part of three years.  He's discovered the transformative power of electronic viewfinder/mirrorless cameras and he's wedding the new camera technology with.......wait for it.......LED lighting systems. Really.  Ground breaking.  Mirrorless cameras (in his case, the new Panasonic GH3) and continuous, LED lighting fixtures. 

I had to smile though as his new site about these trends had an article today about his first foray into lighting portraits with LED's. I chuckled because I've been using LED lighting for portrait work and advertising work for over two years and I have been doing the same work with EVF cameras from Sony (and until recently, Panasonic and Olympus) for at least a year. In fact, the first definitive book about lighting with LEDs for photographers is mine: LED Lighting for Digital Photographers, (Amherst Media) published this past April.

The raw image before dropping out the background.

The timing was also funny. I got his e-mail talking about his first portrait tests with LED lights just as I was settling in to do some post production on this job for a local theater. I shot the images in this blog with my oldest set of LEDs. I used two 500 bulb fixtures on the background and two 1,000 bulb fixtures on the subject. Both of the fixtures used to directly light the subject were color corrected with 1/8th magenta filters and diffused with Rosco Tuff Frost diffusion material. I used a Lastolite Grey/White target disk and set a quick white balance on my camera of choice, a Sony a99 equipped with a Tamron 28-75mm 2.8 SP lens. 

Because of all the misinformation on the web I hasten to add that the background didn't turn green because of the LED lights but because it was dyed green for use as a green screen background, mostly for use in video. The correction set by the camera for WB was not that large.
The color temperature measured in at 5700K and the camera added 7 points of magenta to the mix. The whites are clean, the flesh tones are a good match and the exposures are good. I used the LEDs because we were photographing a shiny book cover as a prop and it's so easy to see when there are reflections on the cover when I use a continuous light source.


My basic exposure was ISO 800 (pretty easy stretch for the sensor in the a99....) 1/125th of a second f4 to f5.6. I shot mostly on a tripod but I did hand hold the close ups.


The session was quick and easy. I was able to pre-chimp every step of the way and the actor was happy not to be flashed in the face over and over again by electronic flash. I think the key to using LEDs for this kind of work (where flesh tones are important) is to be sure and pre-filter the lights to make up for the known dip in the color spectrum (a drop in magenta) and to make a good, initial custom white balance to work with. Especially in cases where you have large areas of rich color in the backgrounds which would surely throw off most auto white balance systems. 

The entire session was watched over by the Visual Science Lab Canine Security and Affection Officer who did a great job warding off weasels and badgers while providing positive encouragement and tail wagging for the studio guests.

I'm still amazed at how short sighted and fearful photographers are when it comes to adapting to new technologies, many of which make our jobs more efficient. I'm happy to see Will recommending the EVFs and LEDs to a mass audience and I'm encouraging any pros who also need to start providing basic video services to their clients to consider and play with LED lights.
It's really one area where the future is NOW. 

You might have to play around a bit to get perfect white balance with the cheapest units like the ones I've used here but I've had a chance to play with a set of Lowell Prime Lights and they have a very high CRI and a very neutral rendering. If you are willing to pay $1800 a panel you'll get a light that lasts a long time and can be used, without filtration, right out of the box.

If you are just getting your feet wet there are some good options on the market for under $200. I really like the Fotodiox 312AS lights which give me a control for intensity and a separate control for color temperature ( from 3200 to 5600K) for around $160. I've bought five of them over the last year and I haven't regretted those purchases for even a second.

On Weds. I'll be doing an assignment for a client that was one of the very first clients I ever did a job for with LED lights. It was almost two years ago and I had just put together my first LED system which consisted of three 500 bulb units and several smaller battery powered units. We shot a series of portraits on their location and several of them ended up as illustrations in my LED book. We did additional portraits for them a year ago and I've been invited back again to do ten or twelve more. I have more lights than I did on the first go around, and a camera that handles lower light output really well. I'm heading to GEAR in the morning to pick up some more correction gel but I'll be using that same, first generation LED technology because it still works well.

I'm happy to use the LEDs. It always leads to discussions like this with clients:  (Me): "...yes, we started to research and test LEDs a couple of years ago when we started getting more and more requests to do short videos for the web. Now we can do one basic set up for both stills and video."

(Client): "Oh, I didn't know you also do video. We've got a video project coming up that I'd like for you to bid on..."

The business is constantly changing. I've found that embracing change is a lot cheaper than fighting it. Remember all those photographers in the early part of this century who claimed that, "Digital Imaging is not ready for prime time yet."? Hmmmmmm. Learning curve.


Saturday, July 01, 2017

CAUTION!!!! BANDING!!!! OMG. OMG.

A shot on stage with LED stage lights at Zach Theatre. Sony A7Rii. 70-200mm f4.0. 1/400th shutter. While banding was not apparent to human eyes watching the play it was horrifically obvious to the electronic shutter in my Sony A7Rii.

You really don't have to go far to find banding in just about any camera that uses an electronic shutter. The camera shutters scan from top to bottom. If the light source creating the image is not a constant source there is a probability that you'll see some banding at one point or another. It's part of every alternating current light source. The only light sources that are truly constant are direct current powered light sources. In days of yore even entry level photographers knew that shooting under (badly ballasted) fluorescent lights would cause banding unless you used a shutter speed long enough to allow the band to travel all the way down each frame before the shutter closed. 1/60th was possible but 1/30th was safe. Going into shutter speeds above 1/125th of second could almost guarantee banding and I have countless examples of this fluorescent light banding in conjunction with Nikon D700's, Nikon D750's and any number of Canons. All cameras without electronic shutters. 

For the last two days the folks at DPReview have been running a "Have you stopped beating your wife yet?" faux scientific article trying to explain why Sony's new a9 camera showed banding when shooting LED driven screens at a sports event. It is in response to

Saturday, November 13, 2010

On location with a box of lights and a few ideas.

If you've been following the blog for any amount of time now you know that I get bored using the same stuff to make photographs with.  The idea of doing the same thing over and over again is not very attractive to me.  I know that for everyone like me there are a bunch of people who want to master one set of tools and use them until the end of time.  I guess you could have done that in decades past but the pace of change seems to accelerate with every passing day.  The things we can do with the newest tools were unimaginable seven years ago.  The high ISO performance of the cameras.  The low "buy in" cost of lights.  Even the avenues to learning have exponentially increased.  You can embrace change and have fun with it or you can hope that "this will be the last camera and lens I will ever have to buy!!!!!"  and stick your head in the sand.  While the profession is rife with nostalgia I have only nostalgia for the fees, not for trying to make good, quick work with a recalcitrant Hasselblad 500 CM and a 2000 watt second Norman flash pack.....

I've been playing with LED lights with the same enthusiasm that I had when I started playing with Nikon SB800 flashes and I came to realize that I could replace my heavy duty (and just plain heavy) studio flashes with a Domke bag full of battery powered, hand holdable, computer controllable flashes.  I think I'm starting to get a handle on the color rendering and the difference in power output vis-a-vis flash and I've been impressed with what can be do with a very high tech/low tech product.  

Why do I say "high tech/low tech product"?  Well, the technology of LED lighting is pretty cool and all based on semiconductor processes.  These are really the first semiconductor lights to hit the market in a wide scale way.  And I say low tech because they offer all the real functionality of a light bulb.  You can turn them on and you can turn them off.  One some models of LED panels you can also dim them. And that's all they do.  They don't calculate fill, they don't auto expose and they don't do anything smart.  The panels just sit there and put out light.   That's a pretty low tech set of features to give to a generation raised on "smart flash" but there are some benefits too.  Since the light from the panels is continuous you can actually see what you are getting while you're shooting.  With continuous light you've instantly cut your "recycle" time to zero so you can really lean on that motor drive if you want to.  If your camera will do 10 fps so will these lights.

Anyway,  I love to take risks so when one of my favorite agencies asked me to help them with a project I told them I'd love to do it if they let me use my new toys to do the job.  Surprisingly, they agreed.

I packed some big LED panels and some small ones.  Here's my box full of the small ones:
I've been buying little panels since I first got interested in shooting video.  They come in handy and I like em.  The first generation I bought are the littler ones.  The come from Dot Line Corp.  I call them DLC 60's because they have 60 LED's on them.  I've done some fun stuff with them and I love the fact that I can click all four panels together to make a small soft bank or a thin or thick strip light.  They are the most primitive panels I own because they have nothing but an on and off switch.  (FTC statement:  All these panels were purchased from either Amazon.com or Precision Camera.  No manufacturer or merchant has given me any free lighting product.)

Just before I started working on this project I also bought two new panels from an Amazon vendor.  These are the slightly bigger units in the photo above.  These panels have 160 LED's each.  They put out about one full stop more illumination than the smaller units and have a number of features including:  A dimmer knob that seamlessly allows you to drop the power from full to next to nothing.  A battery check button with a four LED read out on the back.  The ability to take a ton of different batteries.  A filter slot and supplier diffusion, tungsten and slight green correction filters.  And an articulating mounting foot.  

In practice I find the 160 LED lights to be a wonderful compromise between the lower power of the smaller panels and the size and bulk of the larger A/C panels.  The only thing that would materially im prove this product would the be ability to link together multiple fixtures the way you can on the DLC 60's.  

Pricing on Amazon can be wildly kinetic.  When I first looked at these lights they were in the $90 price range.  The next time I looked the price plunged down to $64 each.  That's what prompted me to buy them.  The vendor I bought them from, Fancier, is now showing "out of stock" but several other companies sell an identical unit and their prices seem to have settled in around $79.  At $64 each they were an absolute "no brainer". 

The 160 LED light is sold on Amazon.com by Fancier, ePhotoInc., Cowboy Studios and several others. I've ordered product from each of them and it's all worked just the way it should.  Here is the way the filter slot works.  Nice.

A side view that shows the dimming switch (also, off and on) as well as the shoe mount.  It's articulated so you can put the LED on a still or video camera and tilt it back to bounce the light off the ceiling.
See how the Sony camcorder battery fits into the back area.  If you open the surrounding door you discover that you can also power the units with six double A batteries.  The unit gets warm during operation but not uncomfortably so.

So, I packed up a complement of large and small LED panels and we went to visit the Austin Technology Incubator.  We had a big shot list.  We needed to do portraits of the staff, some of the start up businesses that are currently resident there and even head shots of interns and advisors.  The location was the old MCC building in north Austin.  It originally housed the Micro Computer Consortium and is a great venue to shoot in.  There's a four story atrium that runs thru the center of the building.

We decided to do our first round of portraits on one of the bridges on the third floor just outside the client's front door.  The agency wanted to have images for a website and wanted very narrow depth of field in each shot.  In the past I would have used small flashes in small soft boxes for this kind of work.  Yesterday I just put a couple of small panels on a stand, covered them with diffusion material and brought them in toward the subject until the illumination on their faces matched the intensity and feel of the background.  I was trying to leverage existing light and added light together.

Here's a sample:
The light is a little harder than I would have lit five years ago but I'm working a bit hotter and a bit contrastier than I have in the past.  Yesterday we worked all day long at ISO 1600 on both the Canon 5Dmk2 and the Canon 60D.  The 60D shows a bit more noise at 100% on screen magnification but responds very well to noise reduction in Lightroom 3.0.

Before we started shooting in earnest I stepped back and made a few wide shots with my art director as a stand in.  You can see how simple the set up is for this shot.  If I wanted to go softer I would have added another two panels to the mix, interconnecting them on the same stand and then put a frame with diffusion about a foot in front of them.  You can see that we're working under the shade of the "bridge" from the next level up while the background is getting full light from the building long skylights.

That's the main reason for adding in the fill light from the panels in the first place.


Here are a few notes about using the LED panels:

1.  If you are expecting to use these to overpower the sunlight on a location you will be profoundly disappointed.  They aren't a replacement for big fill flash in sunlight.

2.  The auto white balance on the newest Canons (60D) is incredible.  It's better than the 5Dmk 2 by a good margin.

3.  You'll need to group LED panels or use them in closer than you might be used to with flash to get the right levels.

4.  It's great to have a continuous light source without being anchored to a power cord.

5.  It's great to shoot without having to worry about radio slaves and syncing.

6.  The goal is to become masterful at mixing ambient light with the light from your panels.

7.  You know how the Eskimo people supposedly have something like 50 words for different kinds of snow?  Well I'm starting to build up my vocabulary in the same way when it comes to the different diffusion options.  From very sheer white material to various thicknesses of ripstop nylon to products called "Luxe"  there is a whole world of diffusion out there that most still photographers don't know about.......and every variation has a slightly different look.

8.  Lithium Ion camcorder batteries are cheap, recharge pretty quickly and last a long time.  I've got them for most of my little LED panels.  We shot 700 frames from 10 am till 5 pm yesterday and all the panels made it thru the day without needing to be recharged or have the batteries switched out.  It was pretty amazing performance.

9.  People blink less with continuous light sources.

10.  Everyone I met was interested in LED technology.

In one of the shots we did in the late afternoon we set up nine different panels.  Some were just scattered on the floor.  Others beamed in from down the hall.  A few were set up in a fashion similar to the way I'd light with other light sources.  It was fun to experiment and really easy to see what I was getting.

I'll repeat it again for all the people who love to do things the same way over and over again.  This stuff looks different.  The shooting style changes.  The areas of focus change.  The shooting techniques change.  And none of this is really a bad thing.  In some ways it's just the continuing evolution of photography brought about by digital technology.

We're past the bleeding edge with this technology and we're joyously embracing the ever accelerating changes.  Hop on in.  The water's fine.

Wednesday, May 25, 2011

As I do more and more video LED's seem more and more important.


 I've been doing more and more video projects and I've come to really appreciate the role of LED's in my lighting tool kit.  I remember the bad old days of video when sensors were barely able to scrap by at ISO equivalents of 80 and 100 without noisy gain and the solution was to bring is lights.  Big lights.  Hot lights.  And if you wanted to do something nice with the light, like pop it thru a scrim you needed even bigger (and hotter) lights.

Now the working methodology is different.  We do a bit of jujitsu with lighting.  We let available light reign and fill in around the edges and we use more efficient and much cooler LED's to fill in, add direction to the light and generally even things out to match the range of the current cameras.

The top image of Noellia Hernandez (now a famous New York theater actor) was taken in the studio as a test for my upcoming book on LED lighting for Amherst Media.  A lot of people trash talk the color quality of LED's and while I'll admit it takes a tiny bit more finesse in PhotoShop or Lightroom there's really nothing you can't do with the better LED light panels when it comes to correct color.

The next three photographs were taken at Fair Bean coffee shop here in Austin.  The second photo from the top shows the placement of a small 160 bulb LED panel on a stand adding some fill to the scene.  Directly behind the light is a big open window.  As you can see in the photo just below the set up shot, the color matching with ambient light is pretty darn good.  Just a touch of fill to make the shots work the way I wanted them to.

 When I'm shooting video I'm mostly using ambient light but there's always the need to add just a little more fill.  Or to add direction to the light.  What I love about working with small and medium sized panels is how convenient they are to place (they have so little front to back depth) and how easy it is to dial up or dial down the levels to match the look I want.  Most of the time I can see the effect I want directly by eye.  Sometimes I'll roll a little test footage just to play it back and make sure that what I'm seeing translates to what the sensors sees.  Either way there's no color shift as I dial up
and down.  I can't say that about any of the strobes I own and I certainly can't say that about conventional hot lights.  I recently went on location to a medical clinic to shoot.  Most of the scene was top lit by florescents and it was okay but I really needed to fill in the shadows as the doctor leaned over a patient in an exam chair.  I did what all the guys always tell you not to do.  I put an LED light directly on the camera and used it as a direct fill.  In that case and in the case of Noellia in the very bottom image, I used the little ring light I talked about on this blog about a month ago.
 I paid $39 for mine, it takes two double "A" batteries and it worked like a charm.  The only way it would have worked better would have been to include a control to vary the output.

In the photos where Noellia is wearing a white coat, just outside the coffee shop, the top one is filled with a panel just behind camera, dialed way down and the second one is lit by a panel just to the side. You can see how the light sculpts her face.  It was good not to rely only on the flat light bouncing all over the place.
The light also tends to clean up the image by adding additional light and a bit warmer color to the scene overall.

Finally,  I included a shot that's pretty close up and filled with the small ring LED on the lens.  Two things I like are the filled shadows and the catchlights in the eyes.  When working close like this with a fixed source you set the exposure based on getting a little closer or a little further away until you get the balance between the on camera light and the ambient light.  Further away gets you less snap and less fill while getting closer makes you stop down (or increase shutter speed) to compensate for the subject to light distance and that makes the background darker.  Thank you inverse square law.

I've noticed that most people are reticent to change.  But once change starts to happen it's no longer a long graceful curve.  Now, when we get to a tipping point everyone seems to capitulate and move to the new technology simultaneously.  Witness the iPad.
Two years ago I didn't have a single LED panel or Ringlight in my
 collection of lighting tools.  Now I can't imagine not having them.  I don't use them all the time.  They aren't economically at the point where you have the power to challenge the sun for mid-Summer fill light.  But in the studio, especially for still life, and for the kinds of open aperture portraits I like to do I now find them indispensable.

I recently saw two lights from Fotodiox that I really want.  One is a variation of the 1000 LED bulb panel I already own but it has two sets of LEDs and can by using them in concert can be varied in color temperature between 3200K and 5,500K.  And the steps between the two are, for all intents and purposes, infinite.  It can also run on battery packs.  The other is a smaller, battery powered version with 312 bulbs that is portable enough to be used on camera or stuffed into a camera bag as a back up.

Kind of fun to realize that the future is here how.  Tomorrow I'll be shooting fast in a school.  That little panel might be just right......


Monday, October 19, 2015

Early experiments with LED lights proved to me that my assumption that LEDs would become a dominant photographic light source was correct.

Cuties. Lit with LED panels. 

Around 2010 I became very interested in LED technology as it related to photography. The consensus at the time was that LEDs were too weak, too color inaccurate and too expensive to ever be a workable light source for photography. I thought I knew differently because I had read about cinematographers already pressing LED lights of various makes into service to illuminate feature films. 

The first, serious LED lights I got were re-branded Chinese units sold by Fotodiox on Amazon.com. They made a $225 light that was constructed of 500 (quasi) daylight balanced, 3mm LED bulbs and they also made a lighting unit that used 1,0000 of the same LEDs. While many technocrats scoffed at what they described as the limited "spectral response" of the lights I knew that the custom white balance capabilities of the modern cameras would be able to compensate for any shortcomings as long as all the light sources were consistently consistent. 

I bought three of the 500 bulb versions and two of the 1,000 bulb units and I proceeded to use them on jobs for me and for clients. While the output was a bit low for action portraits the lights quickly proved themselves as the perfect source for still life photography of all kinds, and food photography, especially. I probably shot over 100 assignments with the first set of LEDs and I sold them to a photographer who has probably used them for hundreds more assignments. 

These lights were the impetus for the book I wrote on LED light for photographers called, LED Lighting For Photographers, which was published in 2012 by Amherst Media. It is still the best selling guide to acquiring and using LED lights for photographers, in the world. 

The basic information and techniques stands the test of time, while the products available have advanced rapidly. I still think the book is worth reading at least once. I suggest you buy it and read it from cover to cover but, if you are a cheap bastard, you can always ask your library to order you a copy....

Wednesday, October 13, 2010

I like images that use natural light and added light. They seem harmonious.

This image of a radiologist was lit with the light of the screen in front of her and also by a small flash in the back of the room that bounced off the ceiling and boosted the overall illumination and added an accent light that separated her hair from the dark screen of the monitor behind her.  I used a Fuji S5 camera to make the photograph and I still marvel at the sharpness and dynamic range when I look at the full sized image.

I shot at f2.8 and, of course, the camera was on a tripod for the exposure.  The tripod often being the most important tool in creating good shots.

Lately I've become very interested in using small LED panels to take the place of flashes.  Part of the reason is the general compulsion to keep learning and to keep commercial photography interesting for me.  But another part of the equation is the belief that these light sources will be become the ubiquitous light sources of the future.  At some point flash might become the specialty tool and LED's the day-to-day lighting instrument of choice.  Maybe not, but there's no real cost for experimenting.

I did a portrait today and I lit it the same way I would have with flash or with tungsten but this morning I decided to use LED panels as my primary light source.  I set up a nine foot wide gray canvas background and lit it with two conjoined, small, battery powered LED panels.  Like these:  Little LED. They made a nice soft glow that surrounded my subject.

I used the six foot by six foot PhotoFlex light panel with diffusion that you've probably seen me use for Zach Scott portraits and other favorite work.  Over to my left and positioned at about a 45 degree angle to my subject.   It's no secret that I love huge, soft light sources. It's a beautiful way to light faces. Behind the large diffusion panel I used two of the ePhoto 500 LED panels.  The photo shoot was very successful but I learned some of the limitations that come with using inexpensive (read: not very color accurate) LED panels.  And I learned that the shortcomings are in no way insurmountable.

Seems that no matter what the distributors say there is a nice big spike in the green spectrum of the lights.  If you do a custom white balance you'll be pretty much okay but you might find some anomalies in the color balance that lead to a few splotches.  I shot my Canon DSLR in RAW so I was able to lower the saturation and increase the luminance of the green channels (and, to a certain extent, the blue channels) in order to compensate.  But here's what I learned through subsequent trial and error:  adding a 1/4 strength minus green gel filter does a reasonably good job compensating for the aberrant color spike.  The name of the game is get the light as close to daylight as possible.

If you don't have a color meter handy you can always set your camera white balance to daylight, shoot a white target, use the color eyedropper to correct to white and note the numbers you get in the Lightroom develop panel.  You're looking for two separate but related parameters.  You want to see how close to 5500 degrees kelvin the color temperature is and you'll want to note how many points of green or magenta have been dialed in to get a neutral white target.  You'll likely see a swing over to the magenta side of the scale which means you'll need to add some magenta to compensate.  If Lightroom indicates that it requires 30  points of magenta to render neutral white you'll probably have a filtration starting point of between 1/4 and 1/2 minus green filter.  That's actually a magenta filter that takes out green.

When you filter you're going to loose some power and that's important with LED panels.  They don't put out a tremendous amount of light and the light they do put out isn't collimated into efficient columns of focused light like you might find in a well designed tungsten fixture.  You may need to move the panels closer in to the diffusion material.  Don't worry.  Nothing will catch on fire.

So, why go through this exercise if you already have tons of great flash equipment that works well?  For one thing, the quality of continuous light is different than flash.  There's also.....no flash.  And that means fewer anticipatory flinches and blinks.  You get into a motordrive rhythm that's heavenly.  And with modern DSLR's you never need to stop.  There's ample light for focusing and the ambient light (after you've figured out the filter factor) makes nice fill light.  It's also new and different.  And for me that's enough.